User Guide
- 1. Introduction
- 2. About
- 3. Quick Start
- 4. Features
- 5. FAQ
- 6. Command summary
- 7. Glossary
- 8. Acknowledgements
1. Introduction
![]()
Welcome and thank you for downloading CoLAB! Are you a university student in search of a reliable app to keep track of your school projects? Do you struggle to keep track of the many tasks and deadlines for various school projects? Do you also tend to forget the various group meetings you have scheduled? You have come to the right place!
CoLAB (Collaboration Lab) is a desktop app for university students to manage their school projects. CoLAB’s main features include:
- Project management
- Contact management
- Today View that surfaces an overview of upcoming events and deadlines
With CoLAB, you can efficiently manage all your school projects through our comprehensive project management tools.
We have designed a user-friendly User Interface (UI) that is intuitive to both first-time users and seasoned ones. It is optimized for use via a Command Line Interface (CLI) while still having the benefits of a clean and inviting Graphical User Interface (GUI). If you can type fast, CoLAB can get your project management tasks done faster than traditional GUI apps.
We look forward to seeing what you accomplish with CoLAB. Get your journey started with the Quick Start section!
2. About
This section serves to familiarise you with the information and terms that would help you make the best use of this user guide.
2.1 Structure of This Document
We have included a large set of features in CoLAB to give you the greatest flexibility over what you can do with it. As such, this User Guide has been structured in a manner that allows you to easily find what you are looking for.
In Section 2.2: Reading this Document, you will find useful tips on efficiently reading this document.
In Section 3: Quick Start, you will find a quick start guide to get you started with using CoLAB.
In Section 4: Features, you will find documentation on all of CoLAB’s commands and features.
In Section 5: FAQ, you may find answers to some questions you may have on using CoLAB.
In Section 6: Command Summary, you will find a summary of CoLAB’s commands.
In Section 7: Glossary, you will find useful descriptions and meanings of terms used in this document.
You can also easily sift through CoLAB’s various commands and features by referring to the Table of Contents at the beginning of this User Guide.
2.2 Reading This Document
This subsection serves to provide explanations on the application’s user interface (UI) as well as symbols, syntax and technical terms used throughout this User Guide. Familiarising yourself with this subsection will make the User Guide easier to read.
2.2.1 Special Formats
Formats discussed in this section may be used in relevant areas of this user guide.
Tips
Messages that appear in a tip box are useful for improving your experience with CoLAB.
Warnings
Messages that appear in a warning box are important to follow as unintended consequences may follow otherwise.
Additional Information
Messages that appear in an information box are additional information that may be useful to know.
Highlights
Words or sentences that appear in these highlighted boxes are being emphasized for their relevance in that section.
Example highlight!
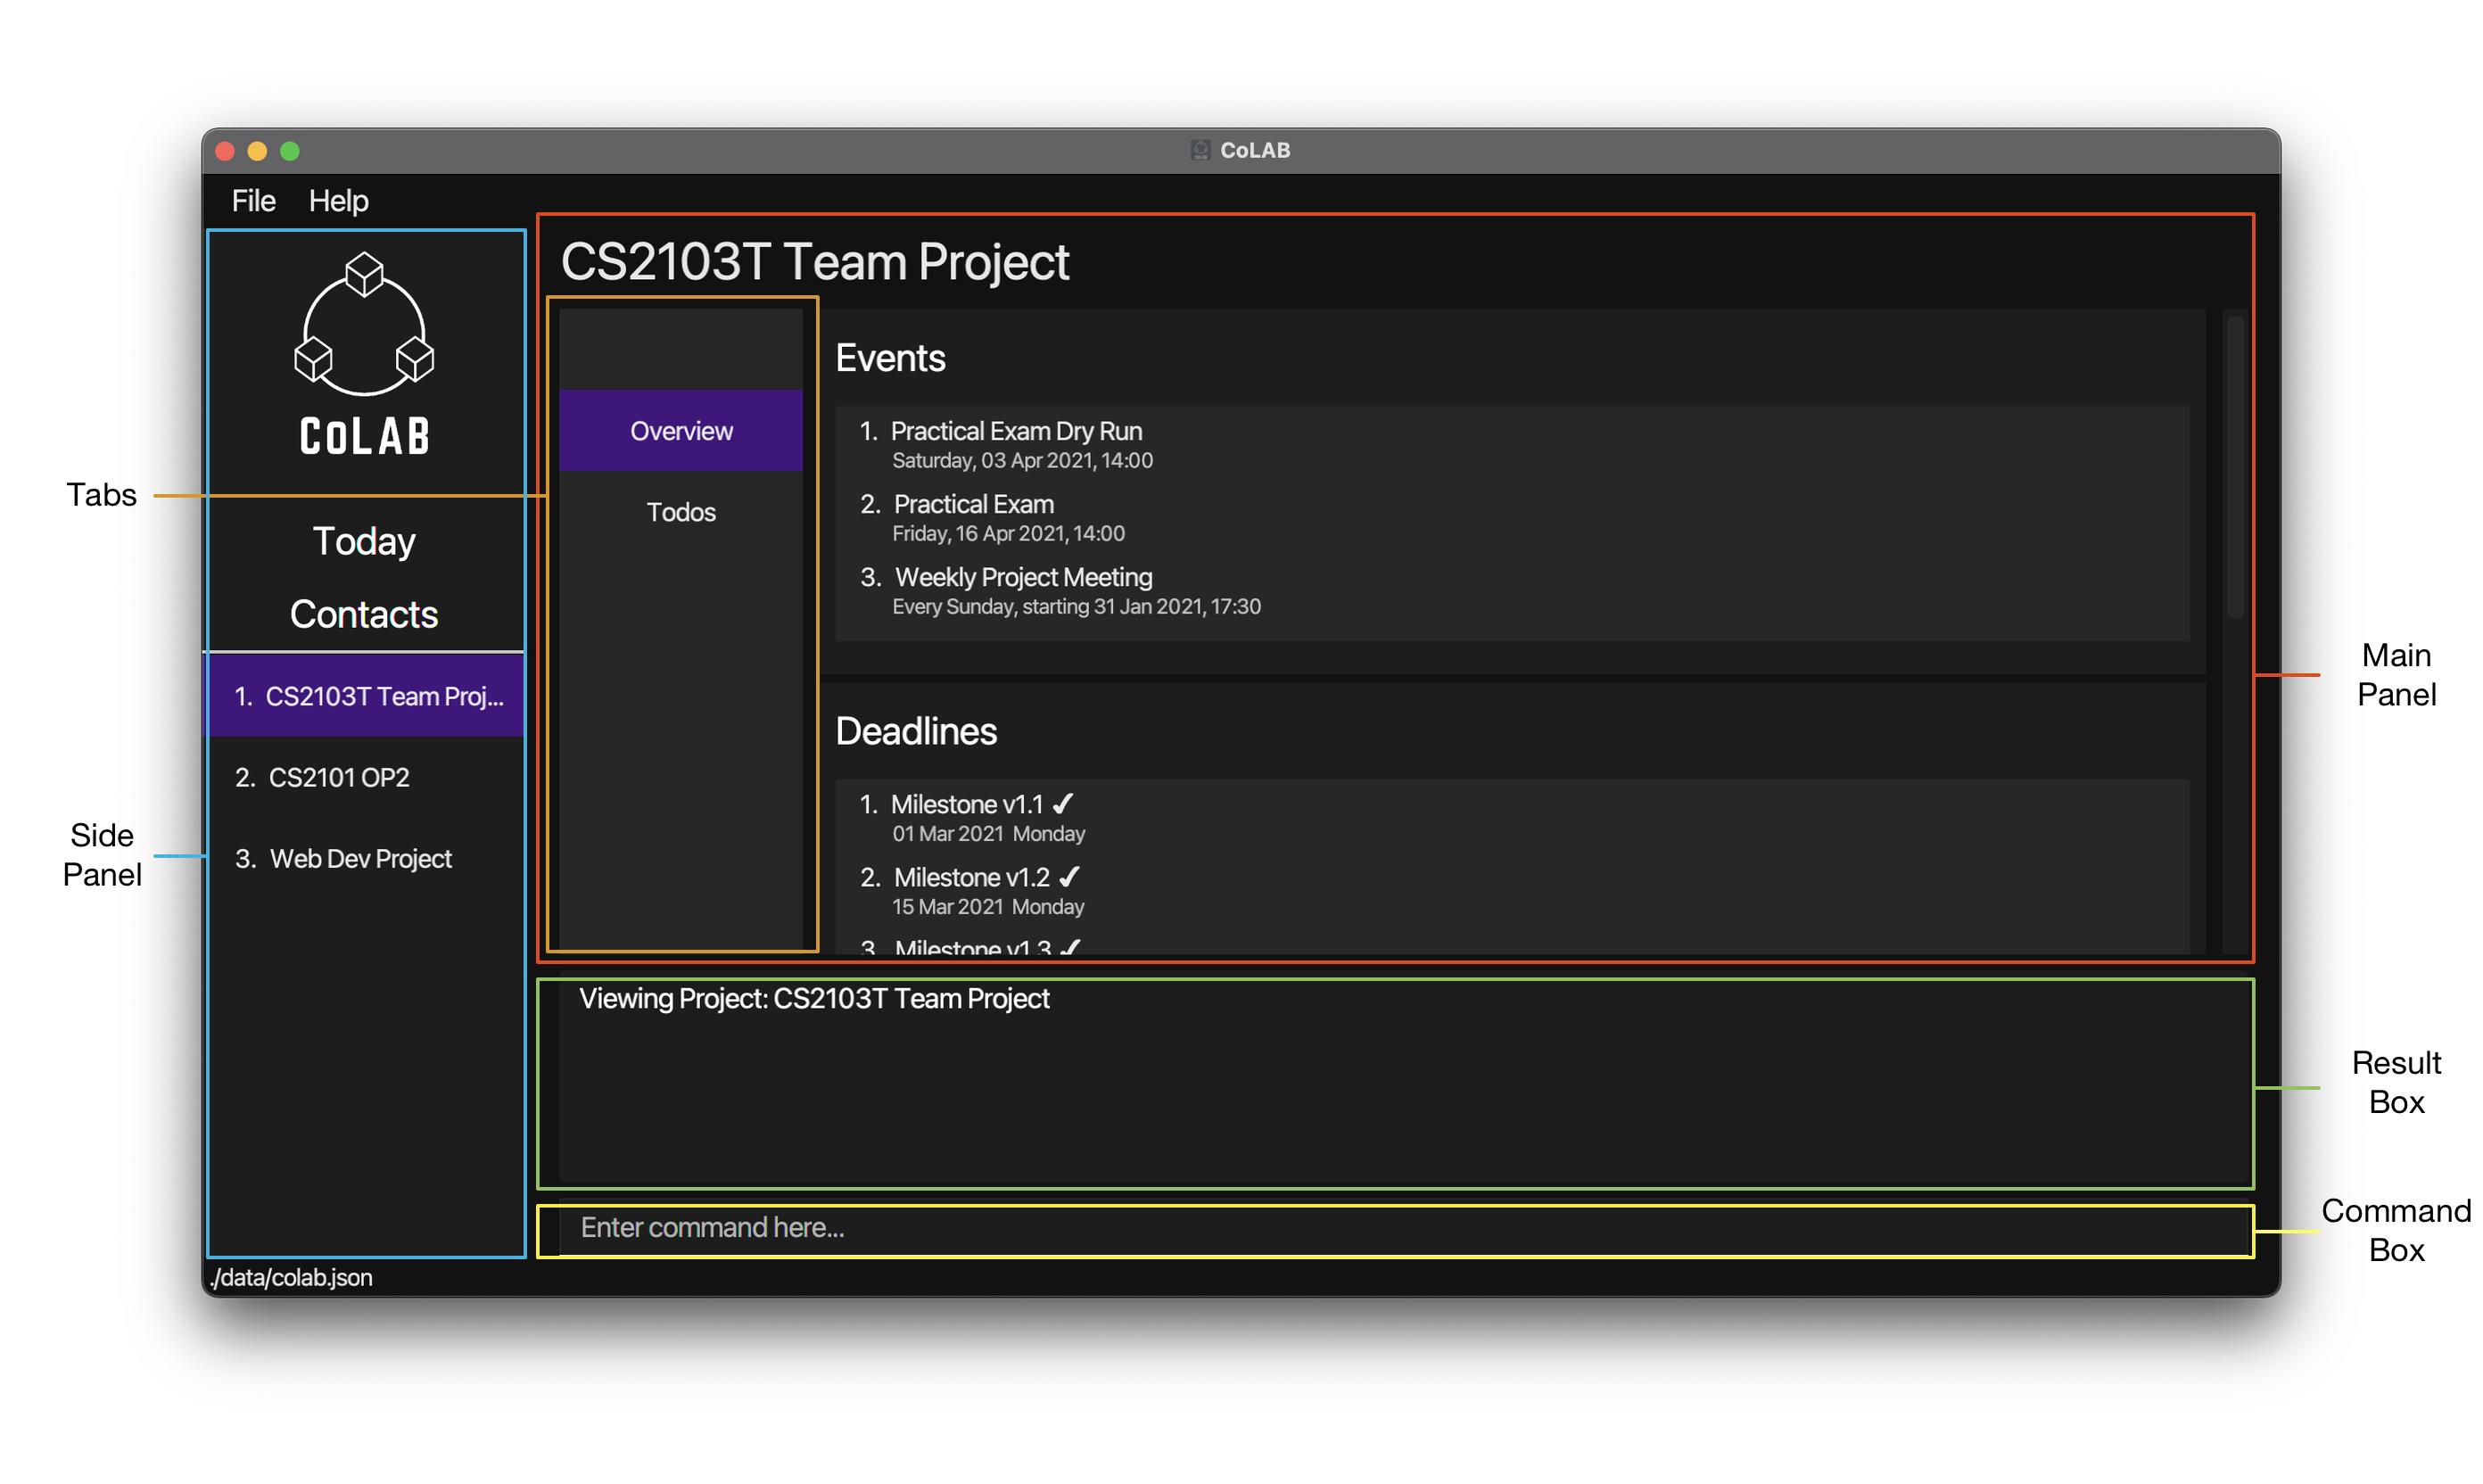
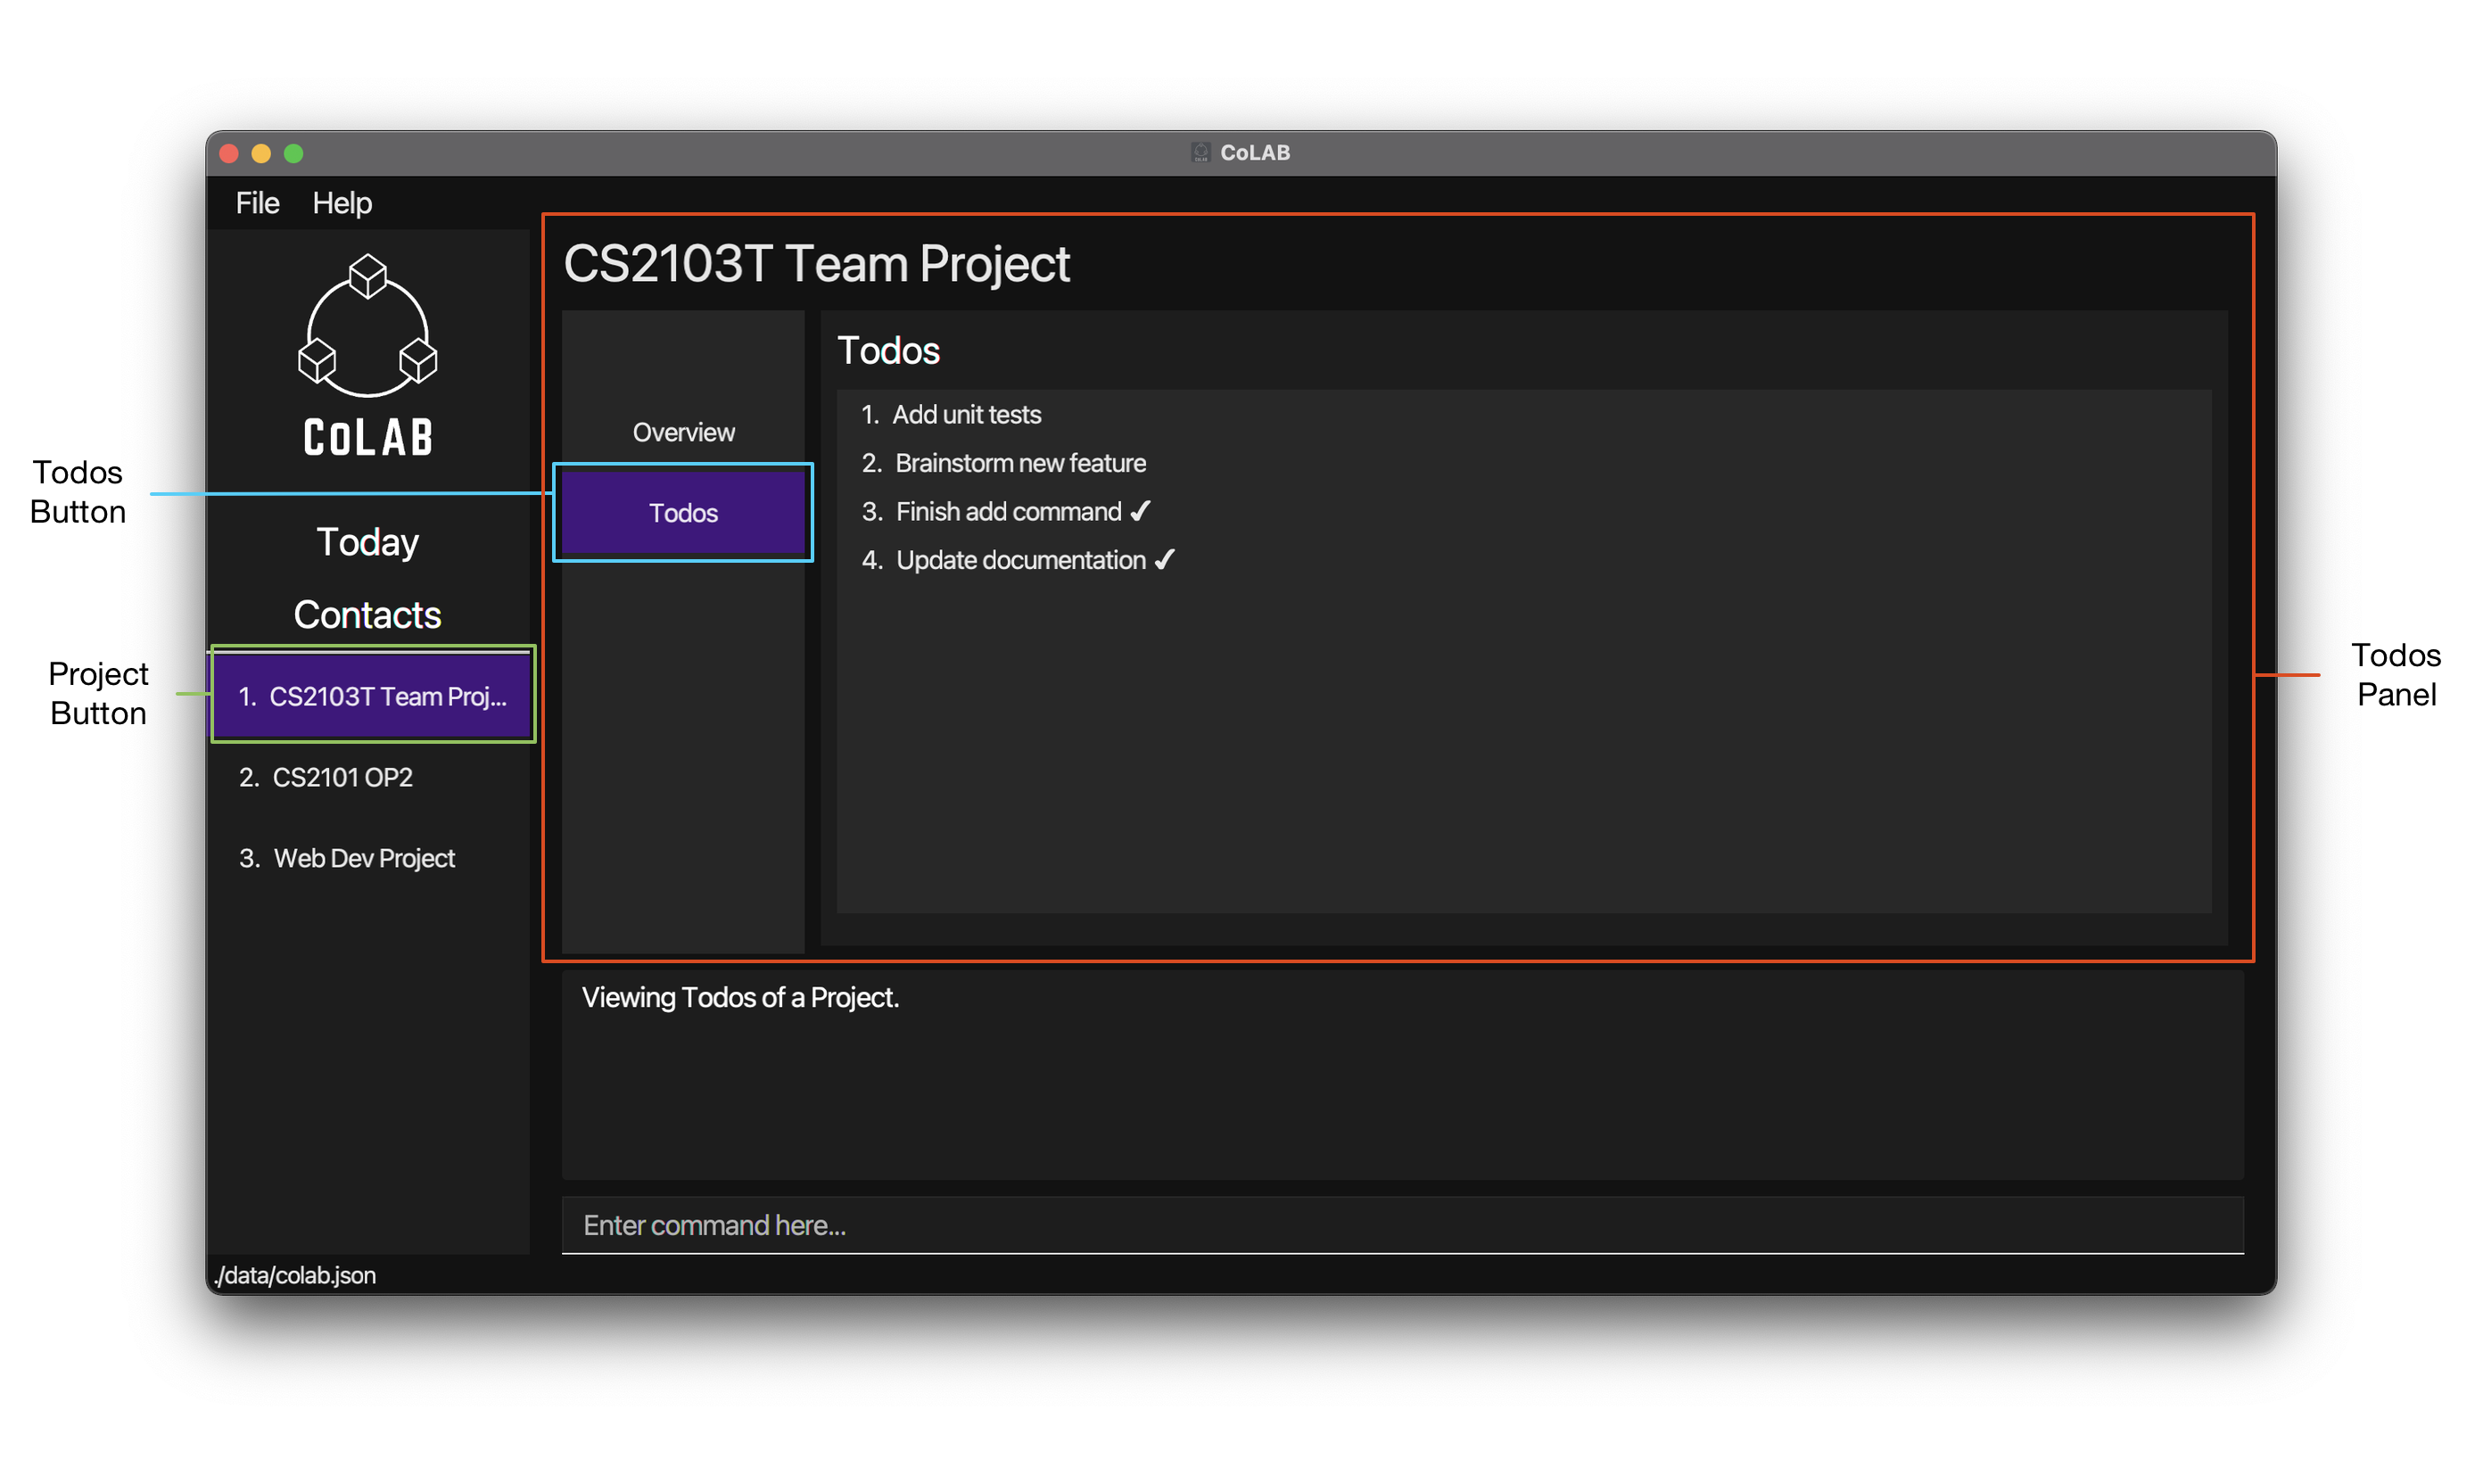
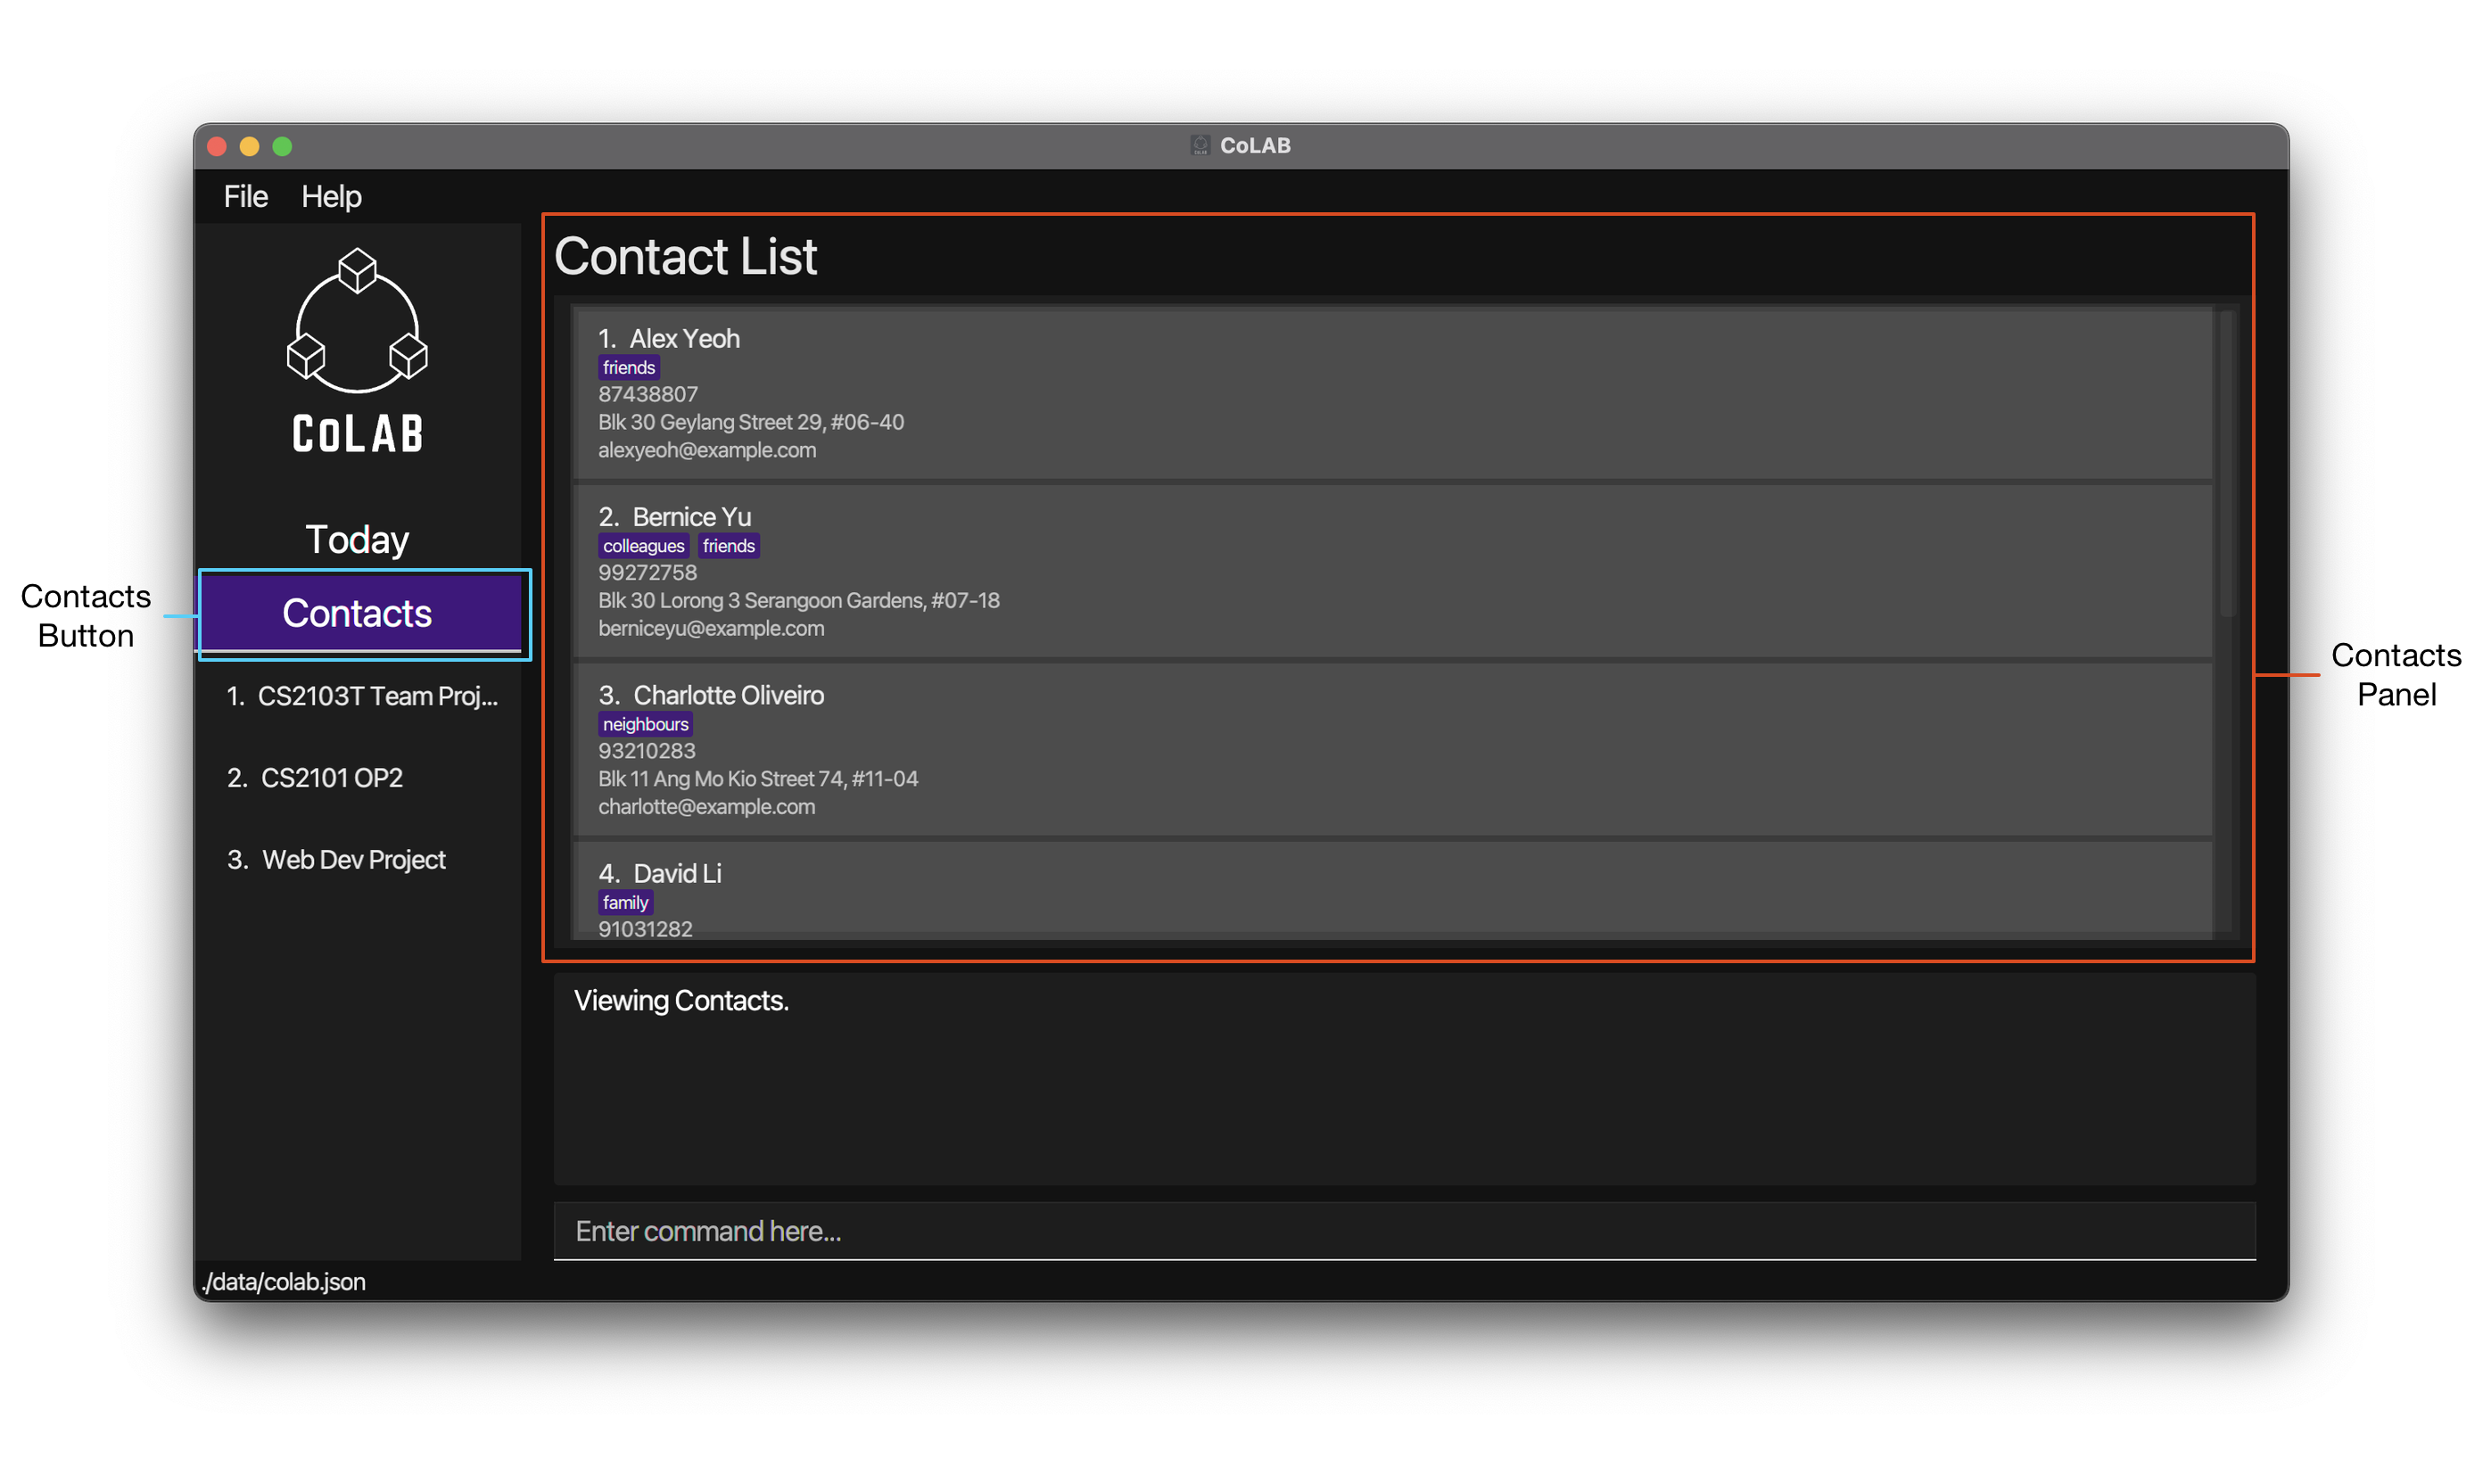
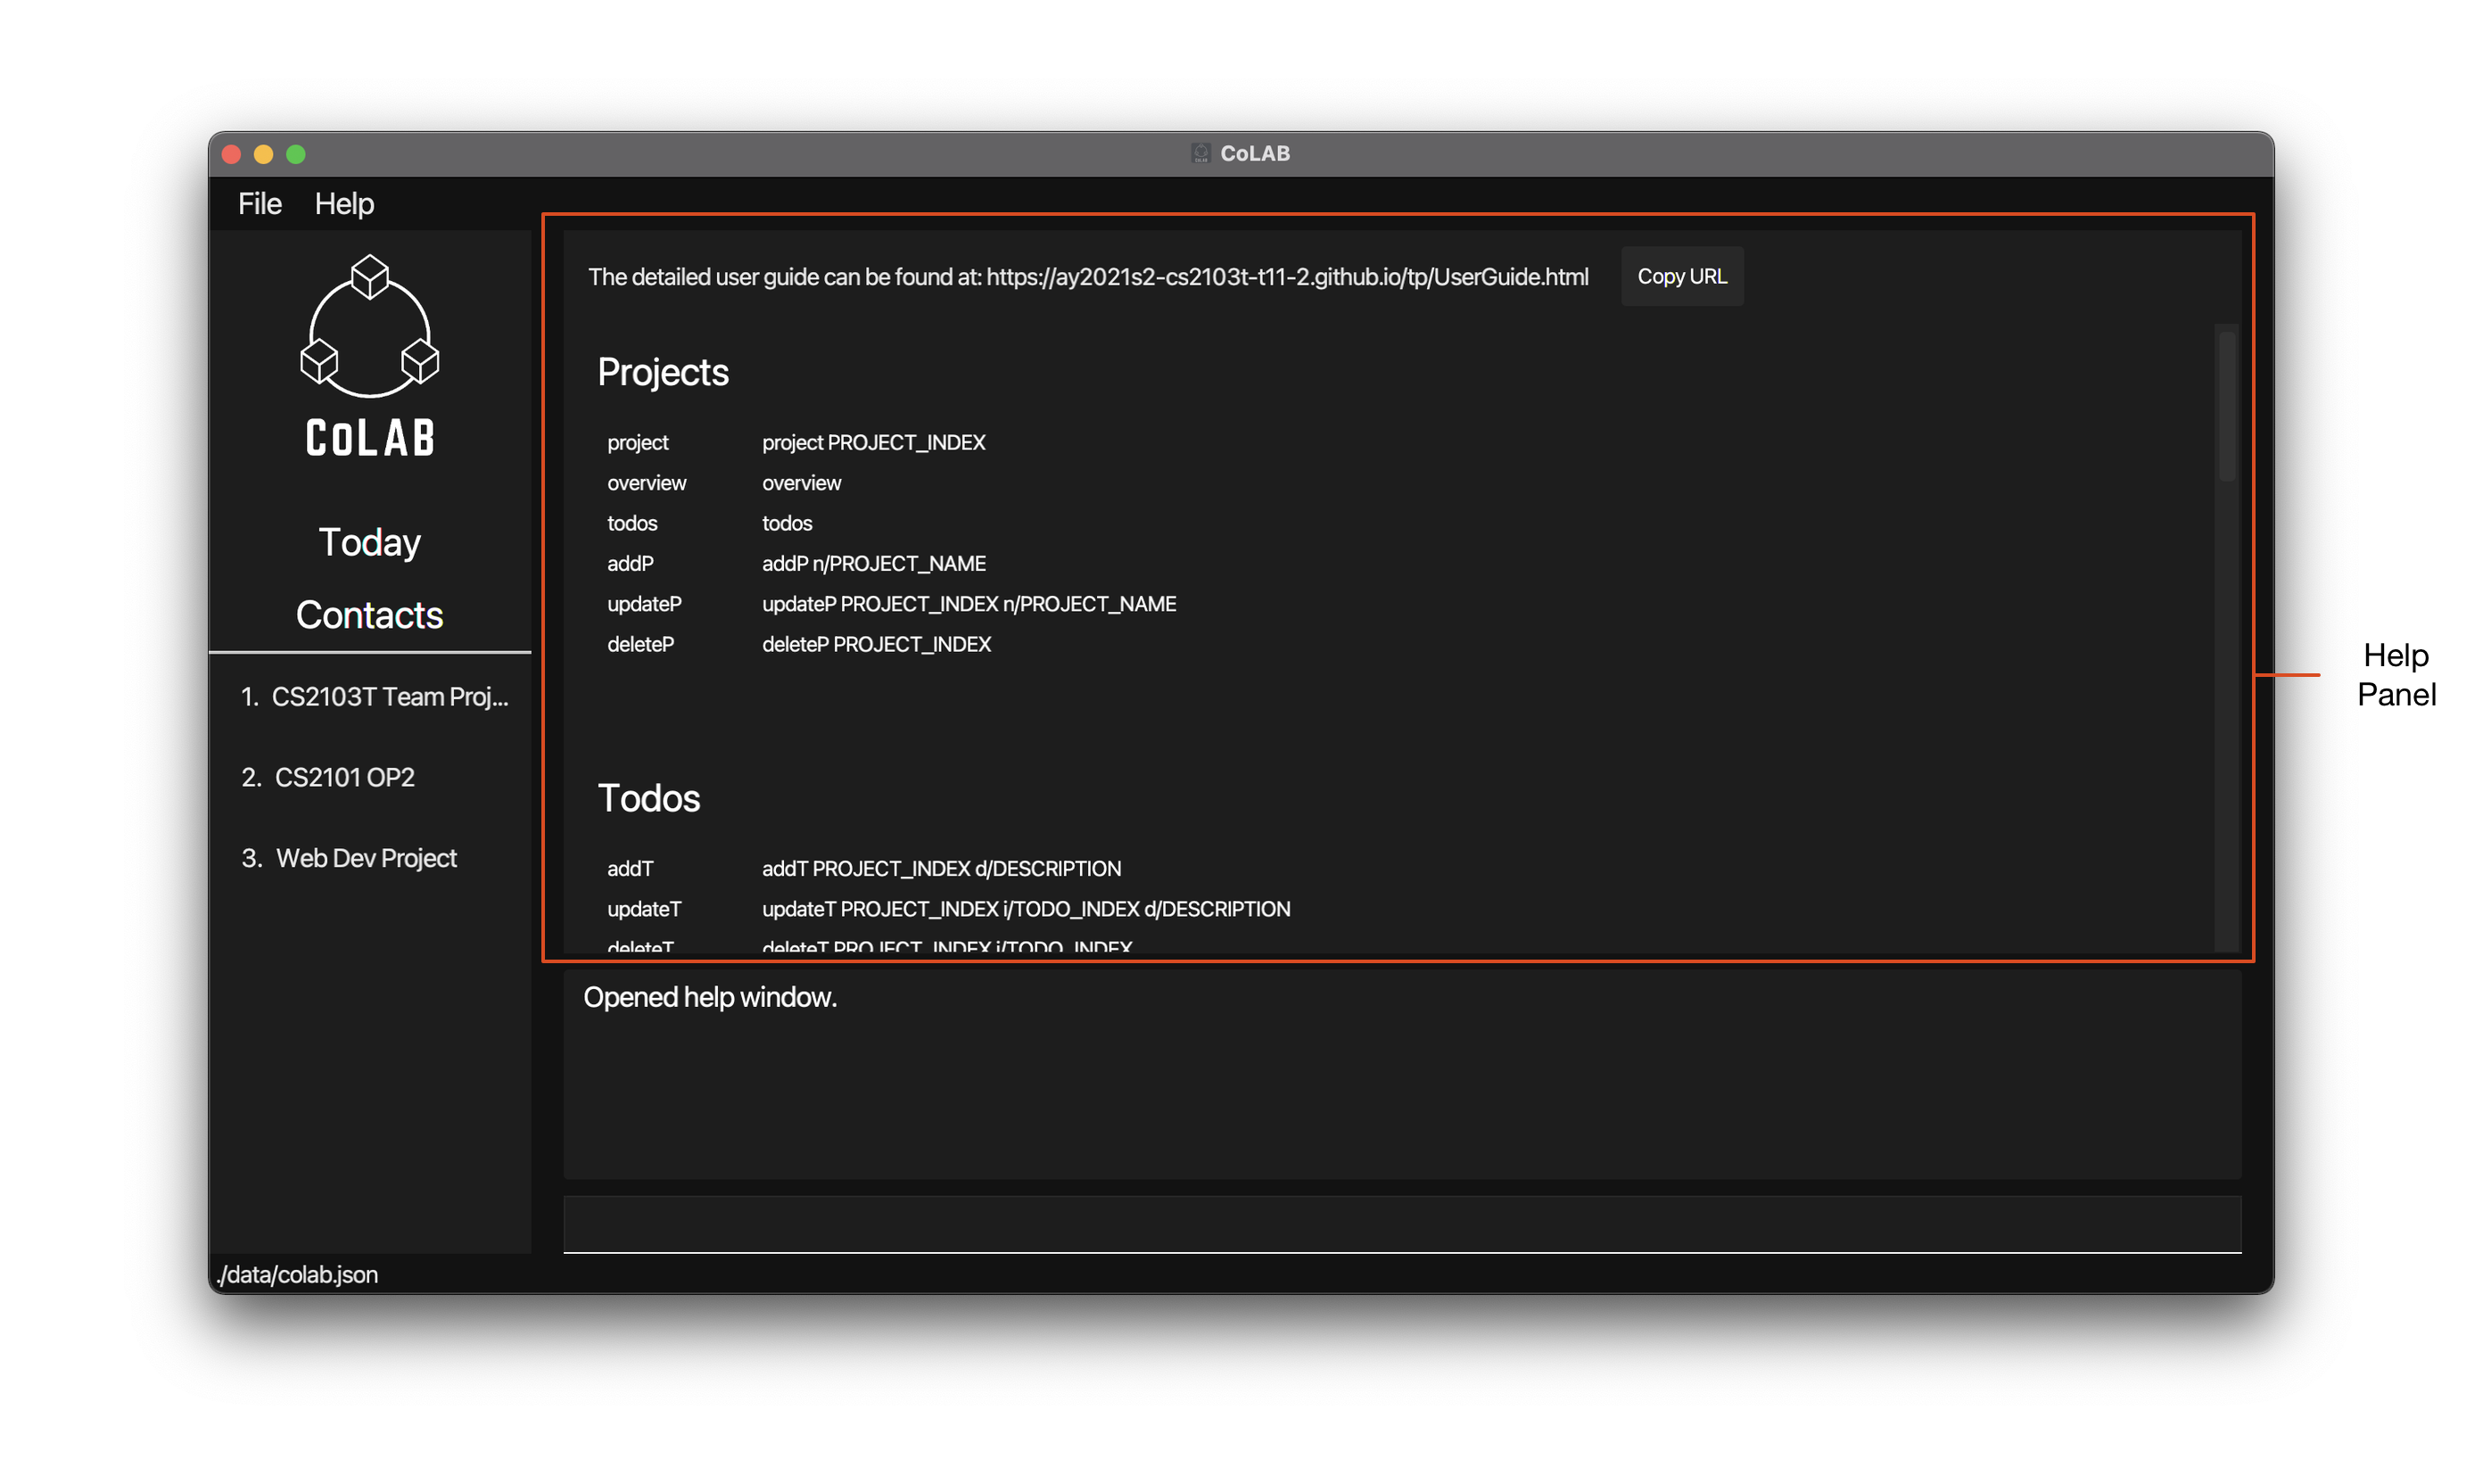
2.2.2 Sections of the Application Window
Different sections of the application window will be referred to by the names described in the image shown below:
2.2.3 Navigating the UI
Although most of the buttons you see on the screen are clickable, the UI has been designed primarily to be navigated using the command line interface.
Users can enter commands into the command box and press ENTER to execute them. The result box will be updated with information on whether the command has been successfully executed. Depending on the command executed, the main panel may also be updated based on the command executed.
When entering a command, you may find it helpful to see a history of your previous commands. To do so simply press UP or DOWN while typing to navigate through the command history list.
2.2.4 Command Format
Commands discussed in this user guide follow these rules:
-
Words in
UPPER_CASEare the parameters to be supplied by the user.
e.g. inaddC n/NAME,NAMEis a parameter that can be used asaddC n/John Doe. -
Items in square brackets are optional.
e.g.n/NAME [t/TAG]can be used asn/John Doe t/friendor asn/John Doe. -
Items with
… after them can be used multiple times including zero times.
e.g.[t/TAG]…can be used ast/friend,t/friend t/familyetc. -
Parameters can be in any order. This excludes a parameter without a prefix, which must be the first parameter when required.
e.g. if the command specifiesn/NAME p/PHONE_NUMBER,p/PHONE_NUMBER n/NAMEis also acceptable.
e.g. if the command specifiesPROJECT_INDEX i/TODO_INDEX d/DESCRIPTION,i/TODO_INDEX d/DESCRIPTION PROJECT_INDEXis not acceptable asPROJECT_INDEXis a parameter without a prefix and should be the first parameter.
![]() Info:
Info:
-
If a parameter is expected only once in a command but you specified it multiple times, only the last occurrence of the parameter will be taken.
e.g. if you specifyp/12341234 p/56785678, onlyp/56785678will be taken. -
Commands that do not take in extra parameters (such as
helpandexit) will ignore the additional parameters that are appended to it.
e.g. if the command specifieshelp 123, it will be interpreted ashelp. -
If a command expects a specific set of parameters, another parameter with an unrecognised prefix would be assumed to be part of the previous parameters input and not as another parameter.
e.g. if a command expects these parametersaddP n/CS2103and instead you enteraddP n/CS2103 p/56785678, the application would assume your input ton/to beCS2103 p/56785678, which may not be valid for certain commands.
2.2.5 Command Parameters
This subsection serves to list out the parameters used in this document.
ADDRESS
- The address of a contact.
- An address can take any value, but it should not be blank.
DATE
- The date associated with a deadline or event.
- Date can be only be entered in one of these formats:
- 23-11-2021
- 23/11/2021
- 23.11.2021
- 23112021
- Date should be a valid date (dd/MM/yyyy) where:
- The Year portion (yyyy) should be a non-negative number between 0000 and 9999.
- The Month portion (MM) should be a non-negative number between 01 and 12.
- The Day portion (dd) should be a non-negative number between 00 and 31 (might be less than 31 depending on the number of days in the month).
DESCRIPTION
- The description of a deadline, event or todo.
- Description can take any values, and it should not be blank.
EMAIL
- The email address of a contact.
- Emails should be of the format local-part@domain.
- The local-part should only contain alphanumeric characters and these special characters,
!#$%&'*+/=?`{|}~^.-. - This is followed by a ‘@’ and then a domain name.
- The domain name must:
- be at least 2 characters long
- start and end with alphanumeric characters
- consist of alphanumeric characters, a period or a hyphen for the characters in between, if any.
INDEX
- Indexes are used to identify specific items in CoLAB. There are 6 types of indexes:
-
CONTACT_INDEXrefers to the number shown beside the contact in the Main Panel when contacts are displayed. -
DEADLINE_INDEXrefers to the number shown beside the deadline in the Main Panel when a project is displayed. -
EVENT INDEXrefers to the number shown beside the event in the Main Panel when a project is displayed. -
GROUPMATE_INDEXrefers to the number shown beside the groupmate in the Main Panel when a project is displayed. -
PROJECT_INDEXrefers to the number shown beside the project name in the side panel. -
TODO_INDEXrefers to the number shown beside the todo in the Main Panel when a project is displayed.
-
- Indexes must be a positive integer 1, 2, 3, …
KEYWORD
- The keyword used to search for contacts.
-
MORE KEYWORDSalso follows this definition. - A keyword can take any value, but it should not be blank.
NAME
- The name of a contact/groupmate/project.
- A name should only contain alphanumeric characters and spaces, and it should not be blank.
PHONE_NUMBER
- The phone number of a contact.
- A phone number should only contain numbers, and it should be at least 3 digits long.
REPEAT_WEEKLY
- Indicates whether the event repeats every week.
-
REPEAT_WEEKLYmust be one of the following values:YNyn
-
Yoryindicates that the event repeats every week. -
Nornindicates that the event is a one-time event.
ROLE
- The role associated with a groupmate in a project.
- Roles should:
- Consist of alphanumeric characters, hyphens and underscores.
- Be at least 2-character long.
- If there are hyphens or underscores, they should not be at the start or end of the role string
TAG
- The tag associated with a contact.
- The
TAGparameter can only be used for contacts. It cannot be used for projects. - Tags should:
- Consist of alphanumeric characters, hyphens and underscores.
- Be at least 2-character long.
- If there are hyphens or underscores, they should not be at the start or end of the tag string
TIME
- The time of an event.
- Time can be only be entered in one of these formats:
- 1730
- 17:30
- Time should be a valid time (from 0000 to 2359) where:
- The Hour portion (first 2 digits) should be a non-negative number between 00 and 23 (inclusive).
- The Minute portion (last 2 digits) should be a non-negative number between 00 and 59 (inclusive).
3. Quick Start
-
Ensure you have Java
11or above installed on your Computer. If you do not have Java11installed, you may download it here. -
Download the latest
CoLAB.jarfrom here. -
Copy the file to the folder you want to use as the home folder for CoLAB.
-
Double-click the file to start the app. The GUI similar to the below should appear in a few seconds. Note how the app contains some sample data.
-
Type the command in the command box and press Enter to execute it. e.g. typing
contactsand pressing Enter will list all contacts.
Some example commands you can try:-
project 1: Displays the first project. -
addPn/My Project: Adds a new project namedMy Projectto CoLAB. -
todos: Displays the todos of the currently displayed project. -
addT1 d/My Task: Adds a todo with the descriptionMy Taskto the first project. -
deleteP3: Deletes the third project from the list. -
exit: Exits the app.
-
-
Refer to the Features below for details of each command.
clear command to clear sample projects and contacts from CoLAB.
4. Features
This section contains documentation on CoLAB’s features and commands.
It is split into various subsections:
4.1 Projects
Each project in CoLAB contains information about todos, deadlines, events and groupmates to help you keep track of everything you need to effectively manage the project.
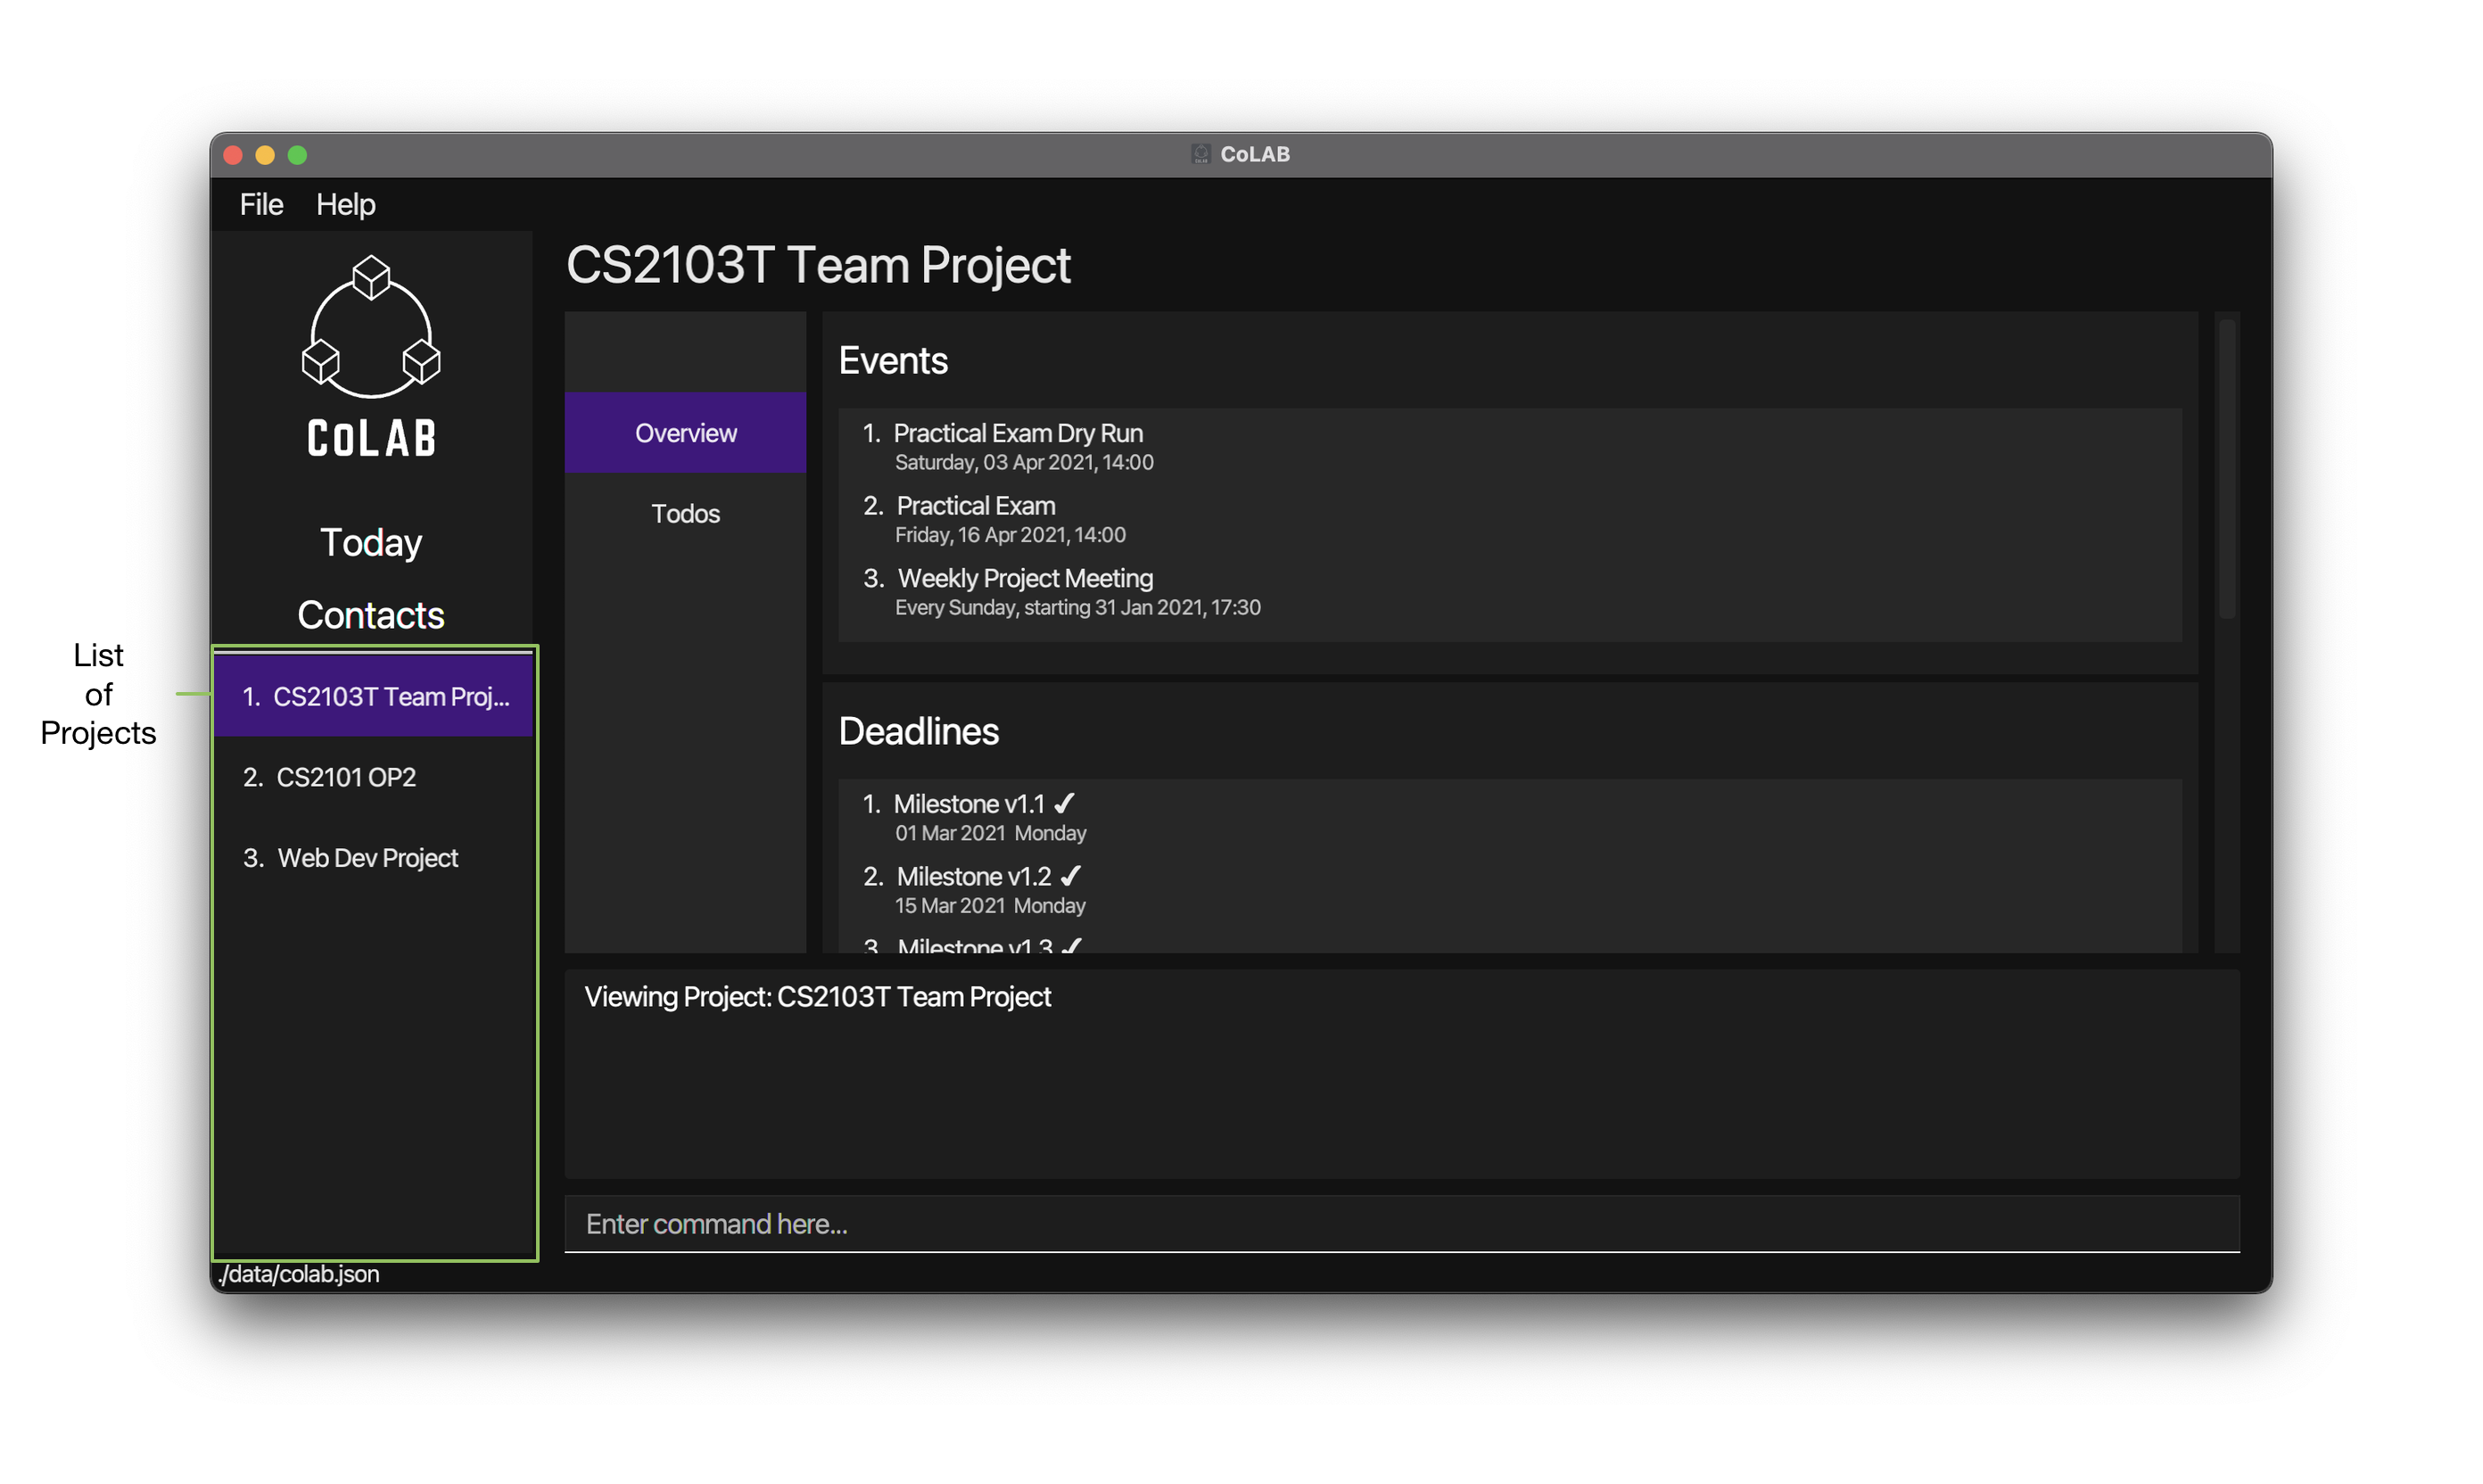
You may view a list of all your projects in the side panel and view a specific project in the main panel using the project command.
project command to view the full name in the main panel.
Each project is divided into an overview page and a todo page. The overview page contains information about your project’s events, deadlines and groupmates and the todo page contains information about your project’s todos.
overview and todos commands respectively.
Commands related to Projects will be discussed first followed by sections on Todos, Deadlines, Events & Groupmates.
Viewing a Project: project
Displays a panel with details of a specified project.
Format: project PROJECT_INDEX
- Displays a panel with details of the project at the specified
PROJECT_INDEX.
Parameter:
-
PROJECT_INDEXThe index of the project.
Example:
-
project 1displays the first project.
Viewing the Overview of a Project: overview
Displays a panel containing an overview of the project that is currently displayed.
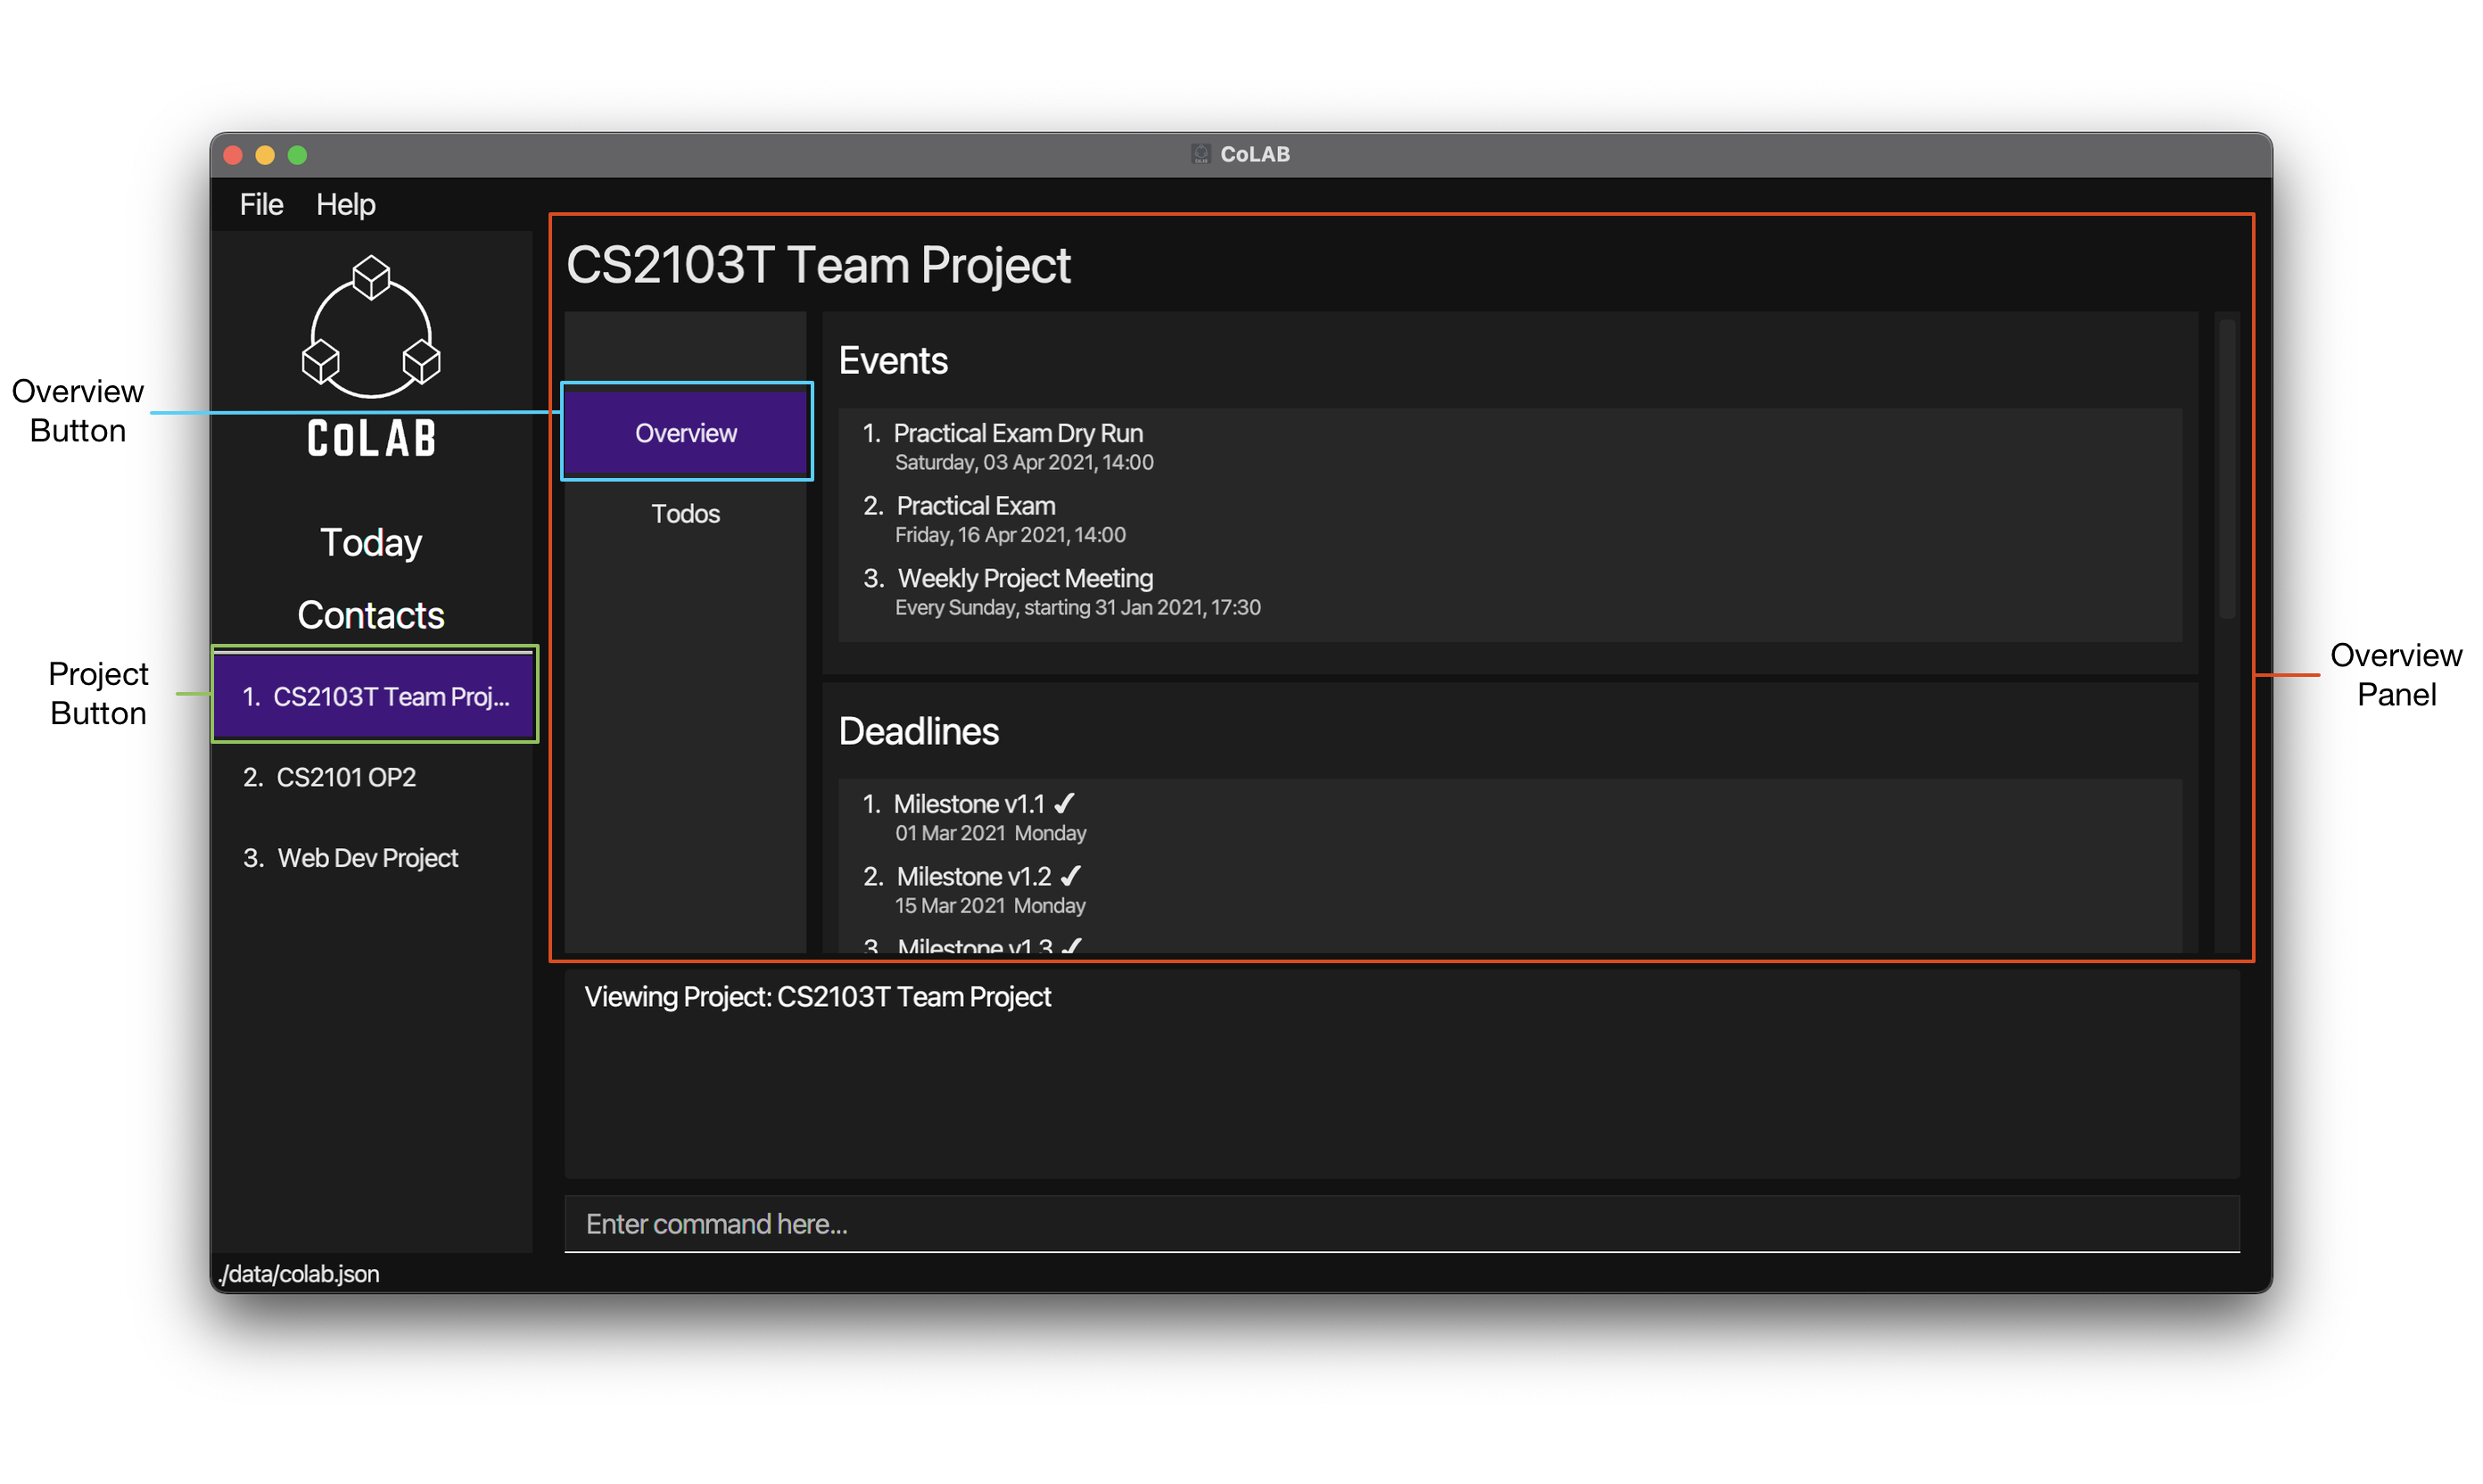
Format: overview
Viewing the Todos of a Project: todos
Displays a panel containing the todos of the project that is currently displayed.
Format: todos
Adding a Project: addP
Adds a project to CoLAB.
Format: addP n/NAME
- Adds a project to CoLAB with a new
NAME.
Parameters:
-
NAMEThe name of the project.
Example:
-
addP n/CS2103T Team Projectadds a project with the nameCS2103T Team Projectto CoLAB.
Updating a Project: updateP
Updates an existing project in CoLAB.
Format updateP PROJECT_INDEX n/NAME
- Updates the name of the project at the specified
PROJECT_INDEXto the newNAME. - Existing values will be updated to the input values.
Parameters:
-
PROJECT_INDEXThe index of the project. -
NAMEThe updated name of the project.
Example:
-
updateP 1 n/CS2103 Group Projectupdates the name of the first project in CoLAB toCS2103 Group Project.
Deleting a Project: deleteP
Deletes a project from CoLAB.
Format: deleteP PROJECT_INDEX
- Deletes the project at the specified
PROJECT_INDEX.
Parameters:
-
PROJECT_INDEXThe index of the project.
Example:
-
deleteP 1deletes the first project in CoLAB.
4.1.1 Todos
Todos are used in CoLAB to represent a task that has to be done. These are usually short-term tasks that have to be done in a short timeframe or have no due date.
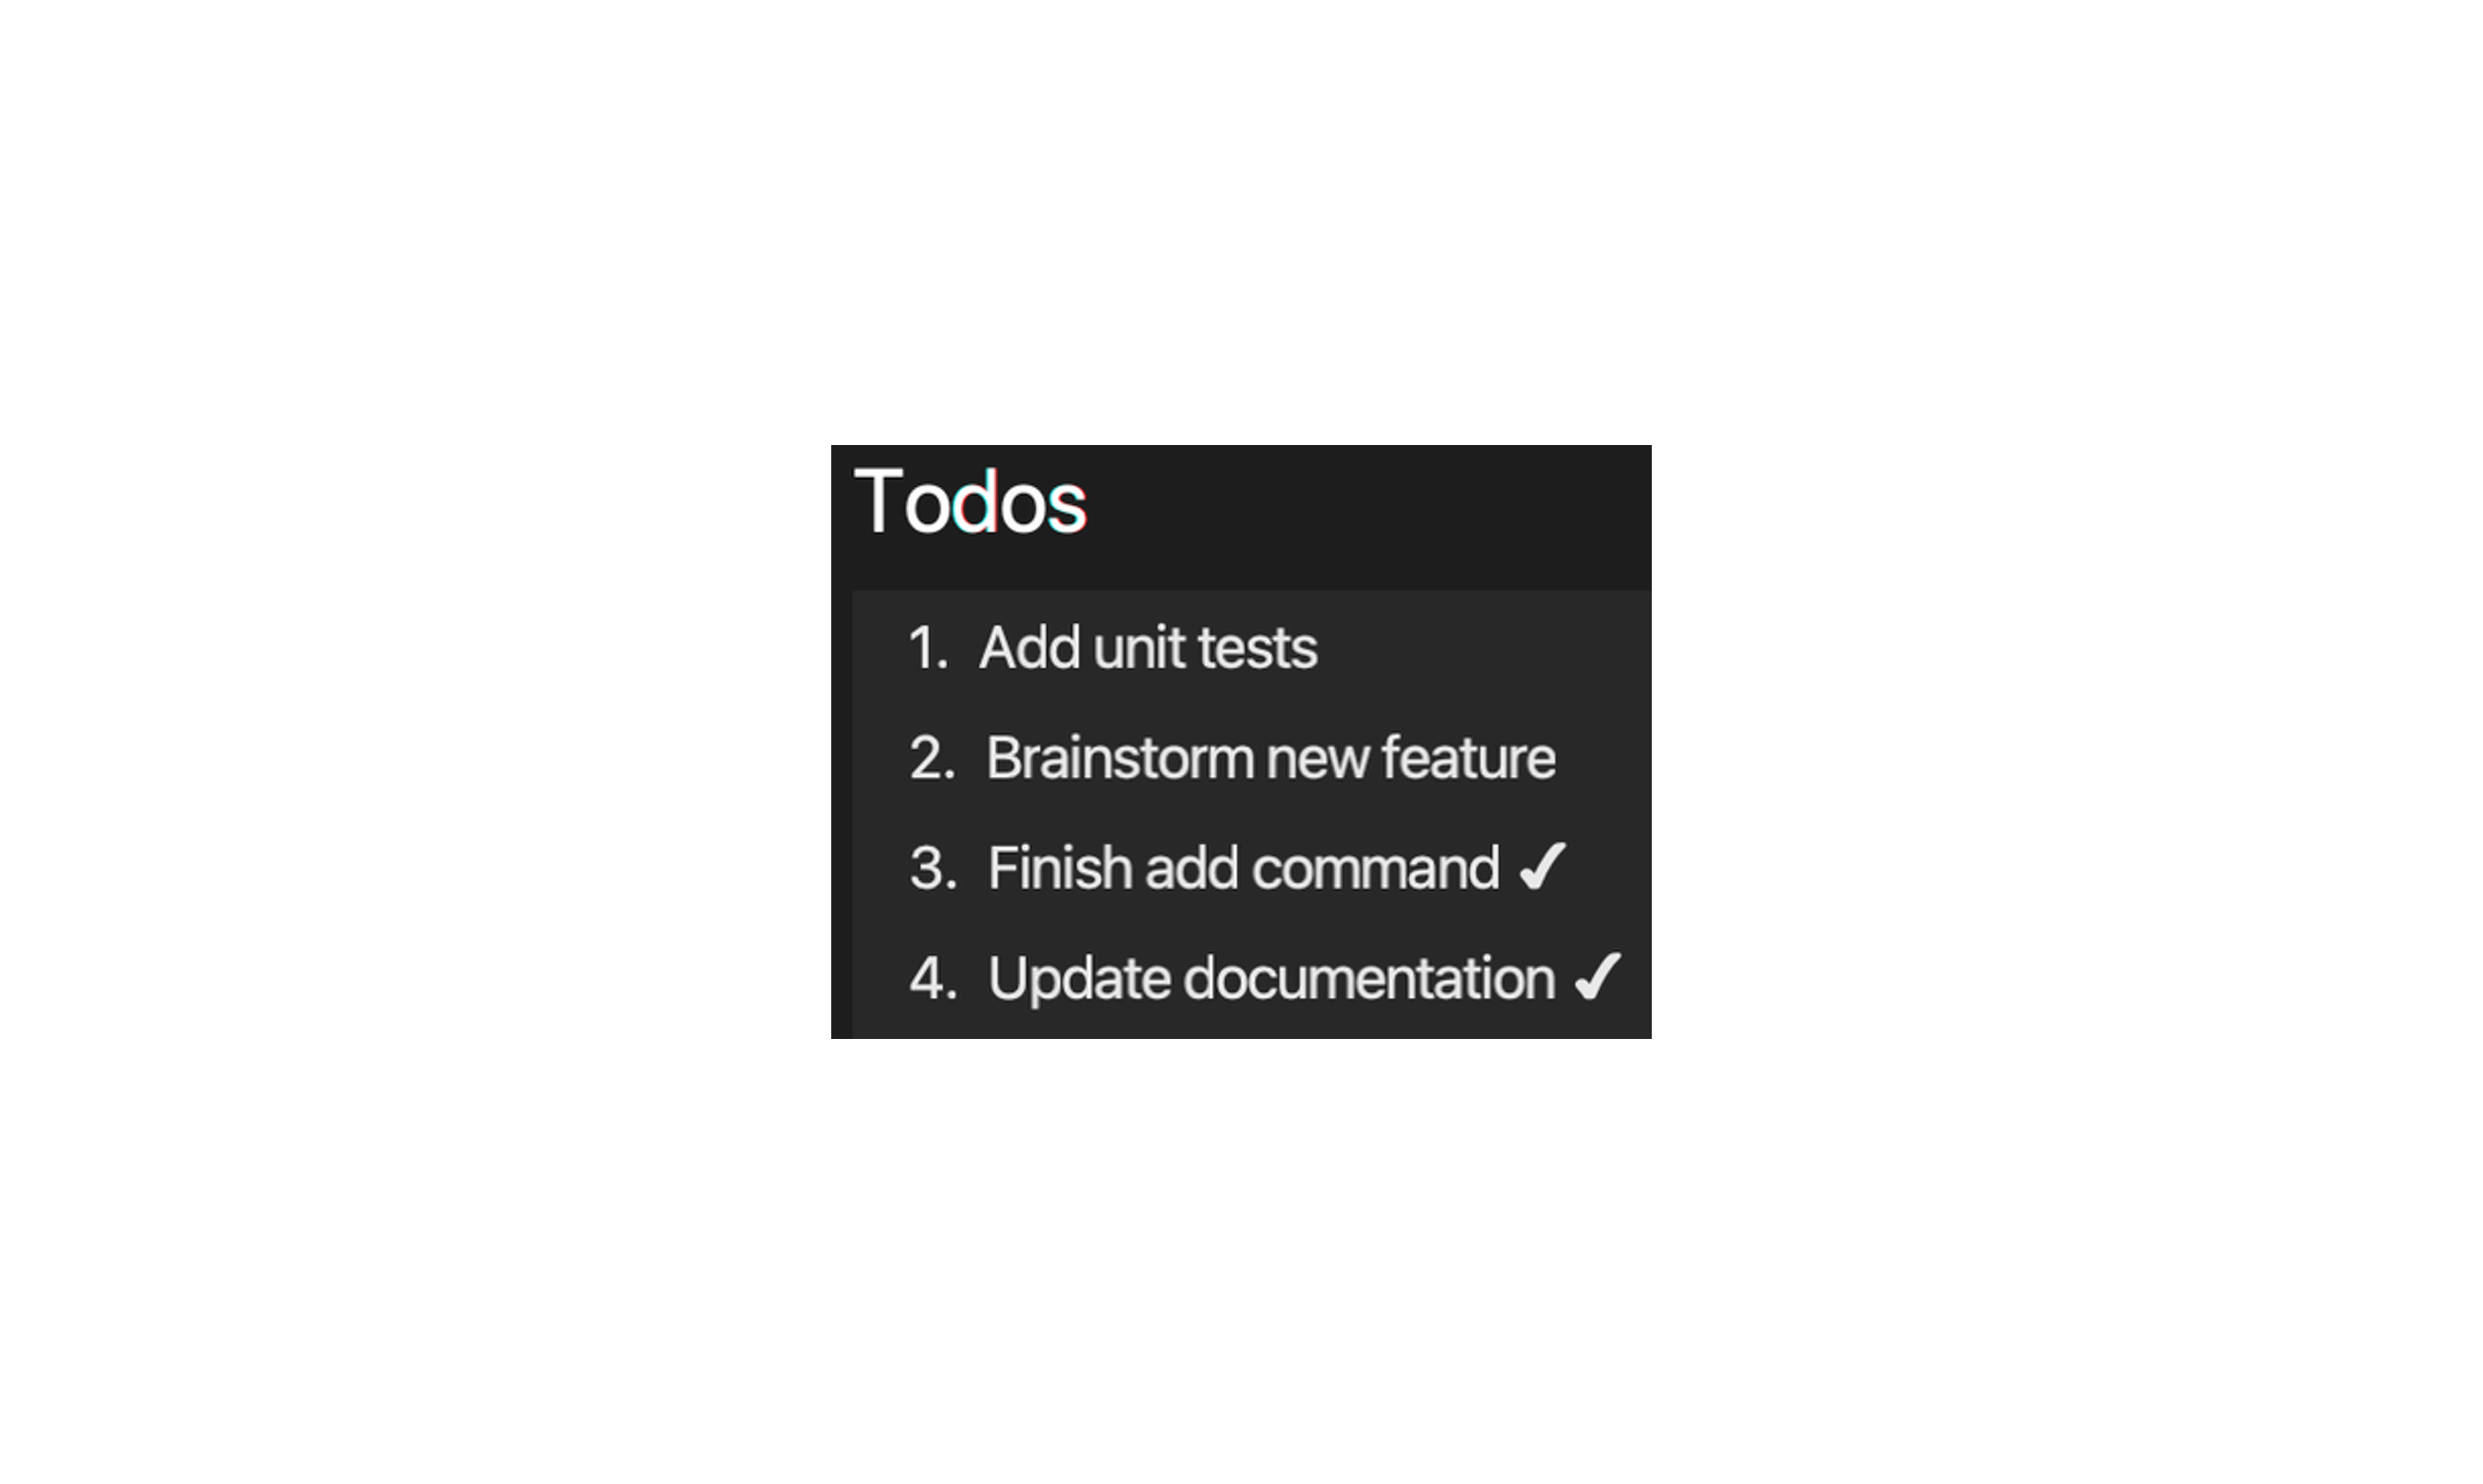
Todos contain a description. They can also be marked as done using the markT command. Todos that have been marked as done have a ✔ next to their description.
Todos are sorted alphabetically.
Adding a Todo to a Project: addT
Adds a todo to a project in CoLAB.
Format: addT PROJECT_INDEX d/DESCRIPTION
- Adds a todo with a
DESCRIPTIONto the project at the specifiedPROJECT_INDEX.
Parameters:
-
PROJECT_INDEXThe index of the project. -
DESCRIPTIONThe description of the todo.
Example:
-
addT 1 d/Add unit testsadds a todo with the descriptionAdd unit teststo the first project in CoLAB.
DESCRIPTION as long as the todo in the project has been marked as done.
Updating a Todo of a Project: updateT
Updates an existing todo of a project in CoLAB.
Format: updateT PROJECT_INDEX i/TODO_INDEX d/DESCRIPTION
- Updates the
DESCRIPTIONof the todo at the specifiedTODO_INDEXof the project at the specifiedPROJECT_INDEX. - Existing values will be updated to the input values.
Parameters:
-
PROJECT_INDEXThe index of the project. -
TODO_INDEXThe index of the todo. -
DESCRIPTIONThe updated description of the todo.
Example:
-
updateT 1 i/2 d/Review latest PRupdates the description of the second todo of the first project with the new descriptionReview latest PR.
Marking a Todo as Done: markT
Marks a todo as done.
Format: markT PROJECT_INDEX i/TODO_INDEX
- Marks the todo at the specified
TODO_INDEXfrom the project at the specifiedPROJECT_INDEXas done.
Parameters:
-
PROJECT_INDEXThe index of the project. -
TODO_INDEXThe index of the todo.
Example:
-
markT 1 i/1marks the first todo of the first project as done.
Deleting a Todo From a Project: deleteT
Deletes a todo from a project in CoLAB.
Format: deleteT PROJECT_INDEX i/TODO_INDEX
- Deletes the todo at the specified
TODO_INDEXfrom the project at the specifiedPROJECT_INDEX.
Parameters:
-
PROJECT_INDEXThe index of the project. -
TODO_INDEXThe index of the todo.
Example:
-
deleteT 1 i/1deletes the first todo of the first project.
4.1.2 Deadlines
Deadlines are used in CoLAB to represent project deadlines.

Deadlines contain a description and a date. They can also be marked as done using the markD command. Deadlines that have been marked as done have a ✔ next to their description.
Deadlines are sorted in ascending order by date.
Adding a Deadline to a Project: addD
Adds a deadline to a project in CoLAB.
Format: addD PROJECT_INDEX d/DESCRIPTION by/DATE
- Adds a deadline to the project at the specified
PROJECT_INDEXwith aDESCRIPTIONand aDATE.
Parameters:
-
PROJECT_INDEXThe index of the project. -
DESCRIPTIONThe description of the deadline. -
DATEThe due date of the deadline.
Example:
-
addD 1 d/Milestone v1.2 by/01-03-2021adds a deadline to the first project with descriptionMilestone v1.2and due date01-03-2021.
DESCRIPTION and DATE as long as the deadline in the project has been marked as done.
Updating a Deadline of a Project: updateD
Updates an existing deadline of a project in CoLAB.
Format: updateD PROJECT_INDEX i/DEADLINE_INDEX [d/DESCRIPTION] [by/DATE]
- Updates the
DESCRIPTIONor the dueDATEof the deadline at the specifiedDEADLINE_INDEXof the project at the specifiedPROJECT_INDEX. - Existing values will be updated to the input values.
Parameters:
-
PROJECT_INDEXThe index of the project. -
DEADLINE_INDEXThe index of the deadline. -
DESCRIPTIONThe updated description of the deadline. -
DATEThe updated due date of the deadline.
Examples:
-
updateD 1 i/2 d/Finish v1.3 by/02-02-2021updates the second deadline of the first project with a new descriptionFinish v1.3and new due date02-02-2021. -
updateD 2 i/1 by/31-03-2021updates the first deadline of the second project with the new due date31-03-2021.
Marking a Deadline as Done: markD
Marks a deadline as done.
Format: markD PROJECT_INDEX i/DEADLINE_INDEX
- Marks the deadline at the specified
DEADLINE_INDEXfrom the project at the specifiedPROJECT_INDEXas done.
Parameters:
-
PROJECT_INDEXThe index of the project. -
DEADLINE_INDEXThe index of the deadline.
Example:
-
markD1 i/1 marks the first deadline of the first project as done.
Deleting a Deadline From a Project: deleteD
Deletes a deadline from a project in CoLAB.
Format: deleteD PROJECT_INDEX i/DEADLINE_INDEX
- Deletes the deadline at the specified
DEADLINE_INDEXfrom the project at the specifiedPROJECT_INDEX.
Parameters:
-
PROJECT_INDEXThe index of the project. -
DEADLINE_INDEXThe index of the deadline.
Example:
-
deleteD 1 i/1deletes the first deadline of the first project.
4.1.3 Events
Events are used in CoLAB to represent project-specific events.
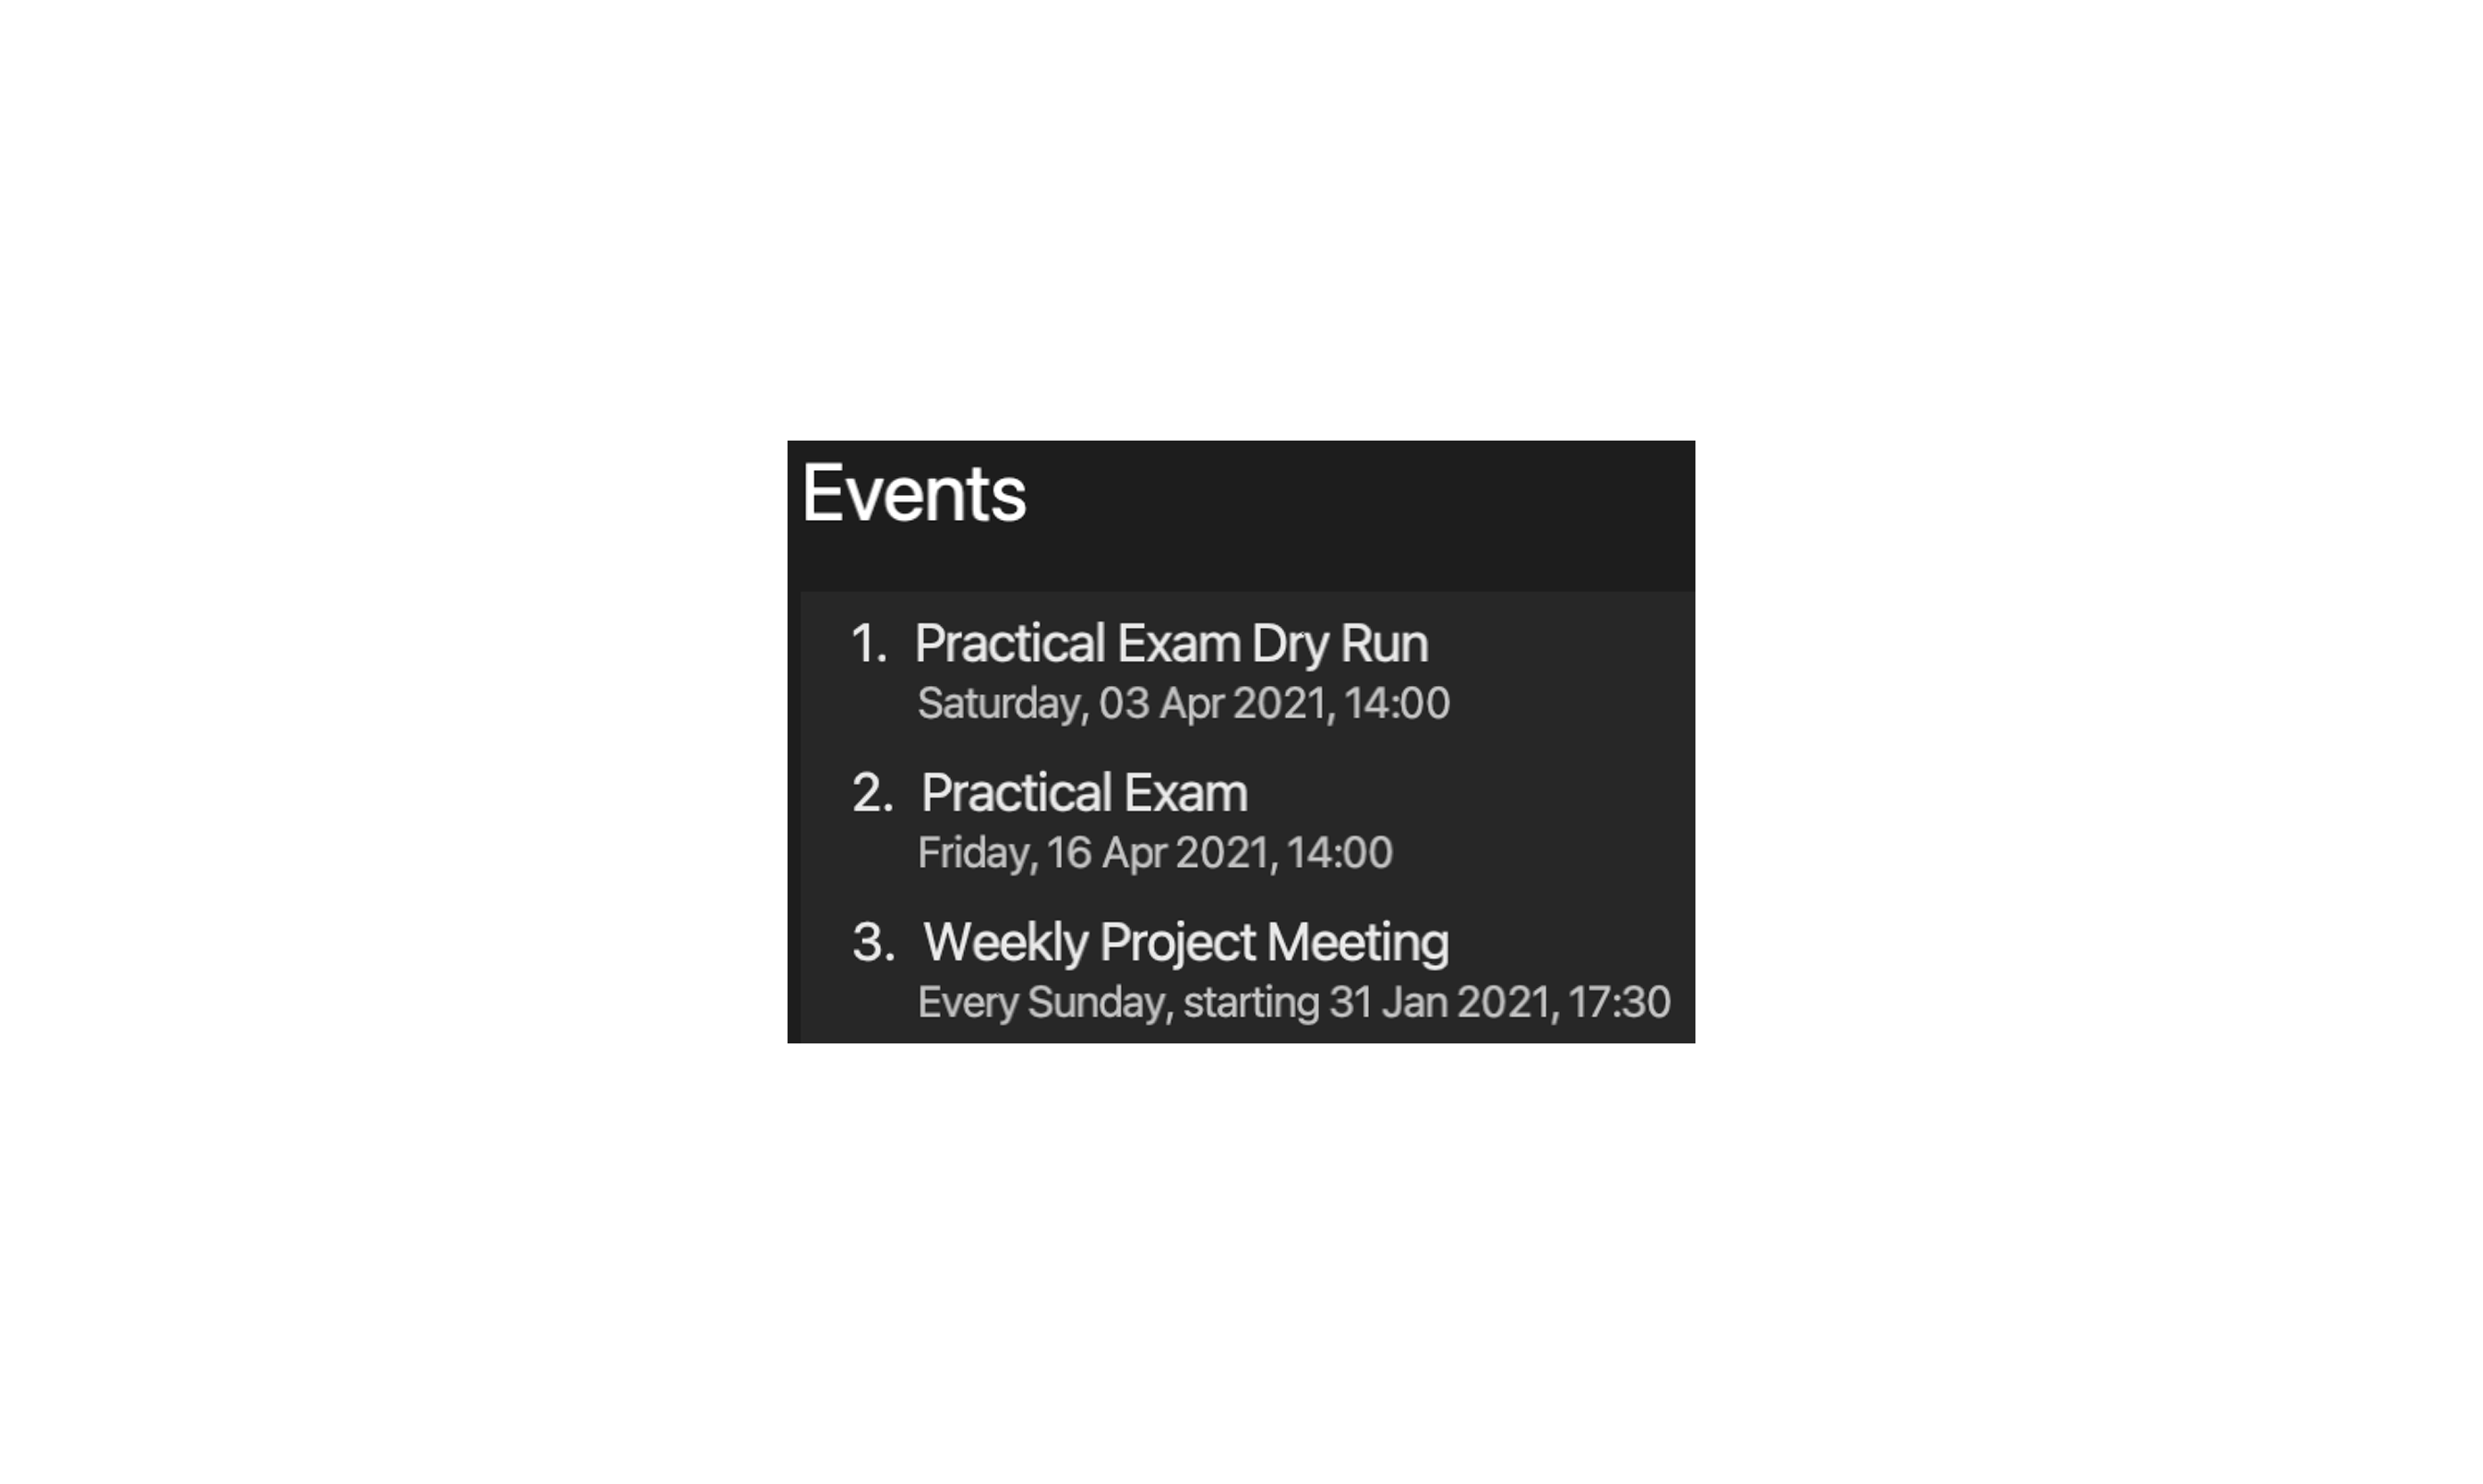
Events contain a description, a date and a time. Events can be set to either occur once or repeat at the same time every week.
Events are sorted in ascending order by date.
Adding an Event to a Project: addE
Adds an event to a project in CoLAB.
Format: addE PROJECT_INDEX d/DESCRIPTION on/DATE at/TIME w/REPEAT_WEEKLY
- Adds an event to the project at the specified
PROJECT_INDEXwith aDESCRIPTIONas well as theDATEandTIMEof the event. -
REPEAT_WEEKLYaccepts valueYoryif the event repeats weekly andNornif the event is a one time event.
Parameters:
-
PROJECT_INDEXThe index of the project. -
DESCRIPTIONThe description of an event. -
DATEThe date of the event, or the starting date of the event if the event repeats every week. -
TIMEThe time of the event. -
REPEAT_WEEKLYIndicates whether the event repeats every week.
Examples:
-
addE 1 d/Project Meeting on/24-04-2021 at/2000 w/Yadds a weekly event with descriptionProject Meetingstarting on24-04-2021at2000to the first project. -
addE 2 d/CS2101 Presentation on/14-04-2021 at/1015 w/nadds a one-time event with descriptionCS2101 Presentationon14-04-2021at1015to the second project.
DESCRIPTION, DATE, TIME and REPEAT_WEEKLY.
Updating an Event of a Project updateE
Updates an existing event of a project in CoLAB.
Format: updateE PROJECT_INDEX i/EVENT_INDEX [d/DESCRIPTION] [on/DATE] [at/TIME] [w/REPEAT_WEEKLY]
- Updates the
DESCRIPTION,DATE,TIMEorREPEAT_WEEKLYstatus of the event at the specifiedEVENT_INDEXof the project at the specifiedPROJECT_INDEX. - Existing values will be updated to the input values.
-
REPEAT_WEEKLYaccepts valueYoryif the event repeats weekly andNornif the event is a one-time event.
Parameters:
-
PROJECT_INDEXThe index of the project. -
EVENT_INDEXThe index of the event. -
DESCRIPTIONThe updated description of the event. -
DATEThe updated date of the event, or the updated starting date of the event if the event repeats every week. -
TIMEThe updated time of the event. -
REPEAT_WEEKLYIndicates whether the event repeats every week.
Examples:
-
updateE 1 i/1 d/Project Meeting on/24-04-2021 w/Yupdates the first event of the first project to be a weekly event with a new descriptionProject Meetingstarting on24-04-2021. -
updateE 2 i/2 on/14-04-2021 at/1015updates the second event of the second project to a new date14-04-2021at1015.
Deleting an Event From a Project: deleteE
Deletes an event from a project in CoLAB.
Format: deleteE PROJECT_INDEX i/EVENT_INDEX
- Deletes the event at the specified
EVENT_INDEXfrom the project at the specifiedPROJECT_INDEX.
Parameters:
-
PROJECT_INDEXThe index of the project. -
EVENT_INDEXThe index of an event.
Example:
-
deleteE 1 i/1deletes the first event of the first project.
4.1.4 Groupmates
Groupmates are used in CoLAB to represent the people you are working with for a particular project.
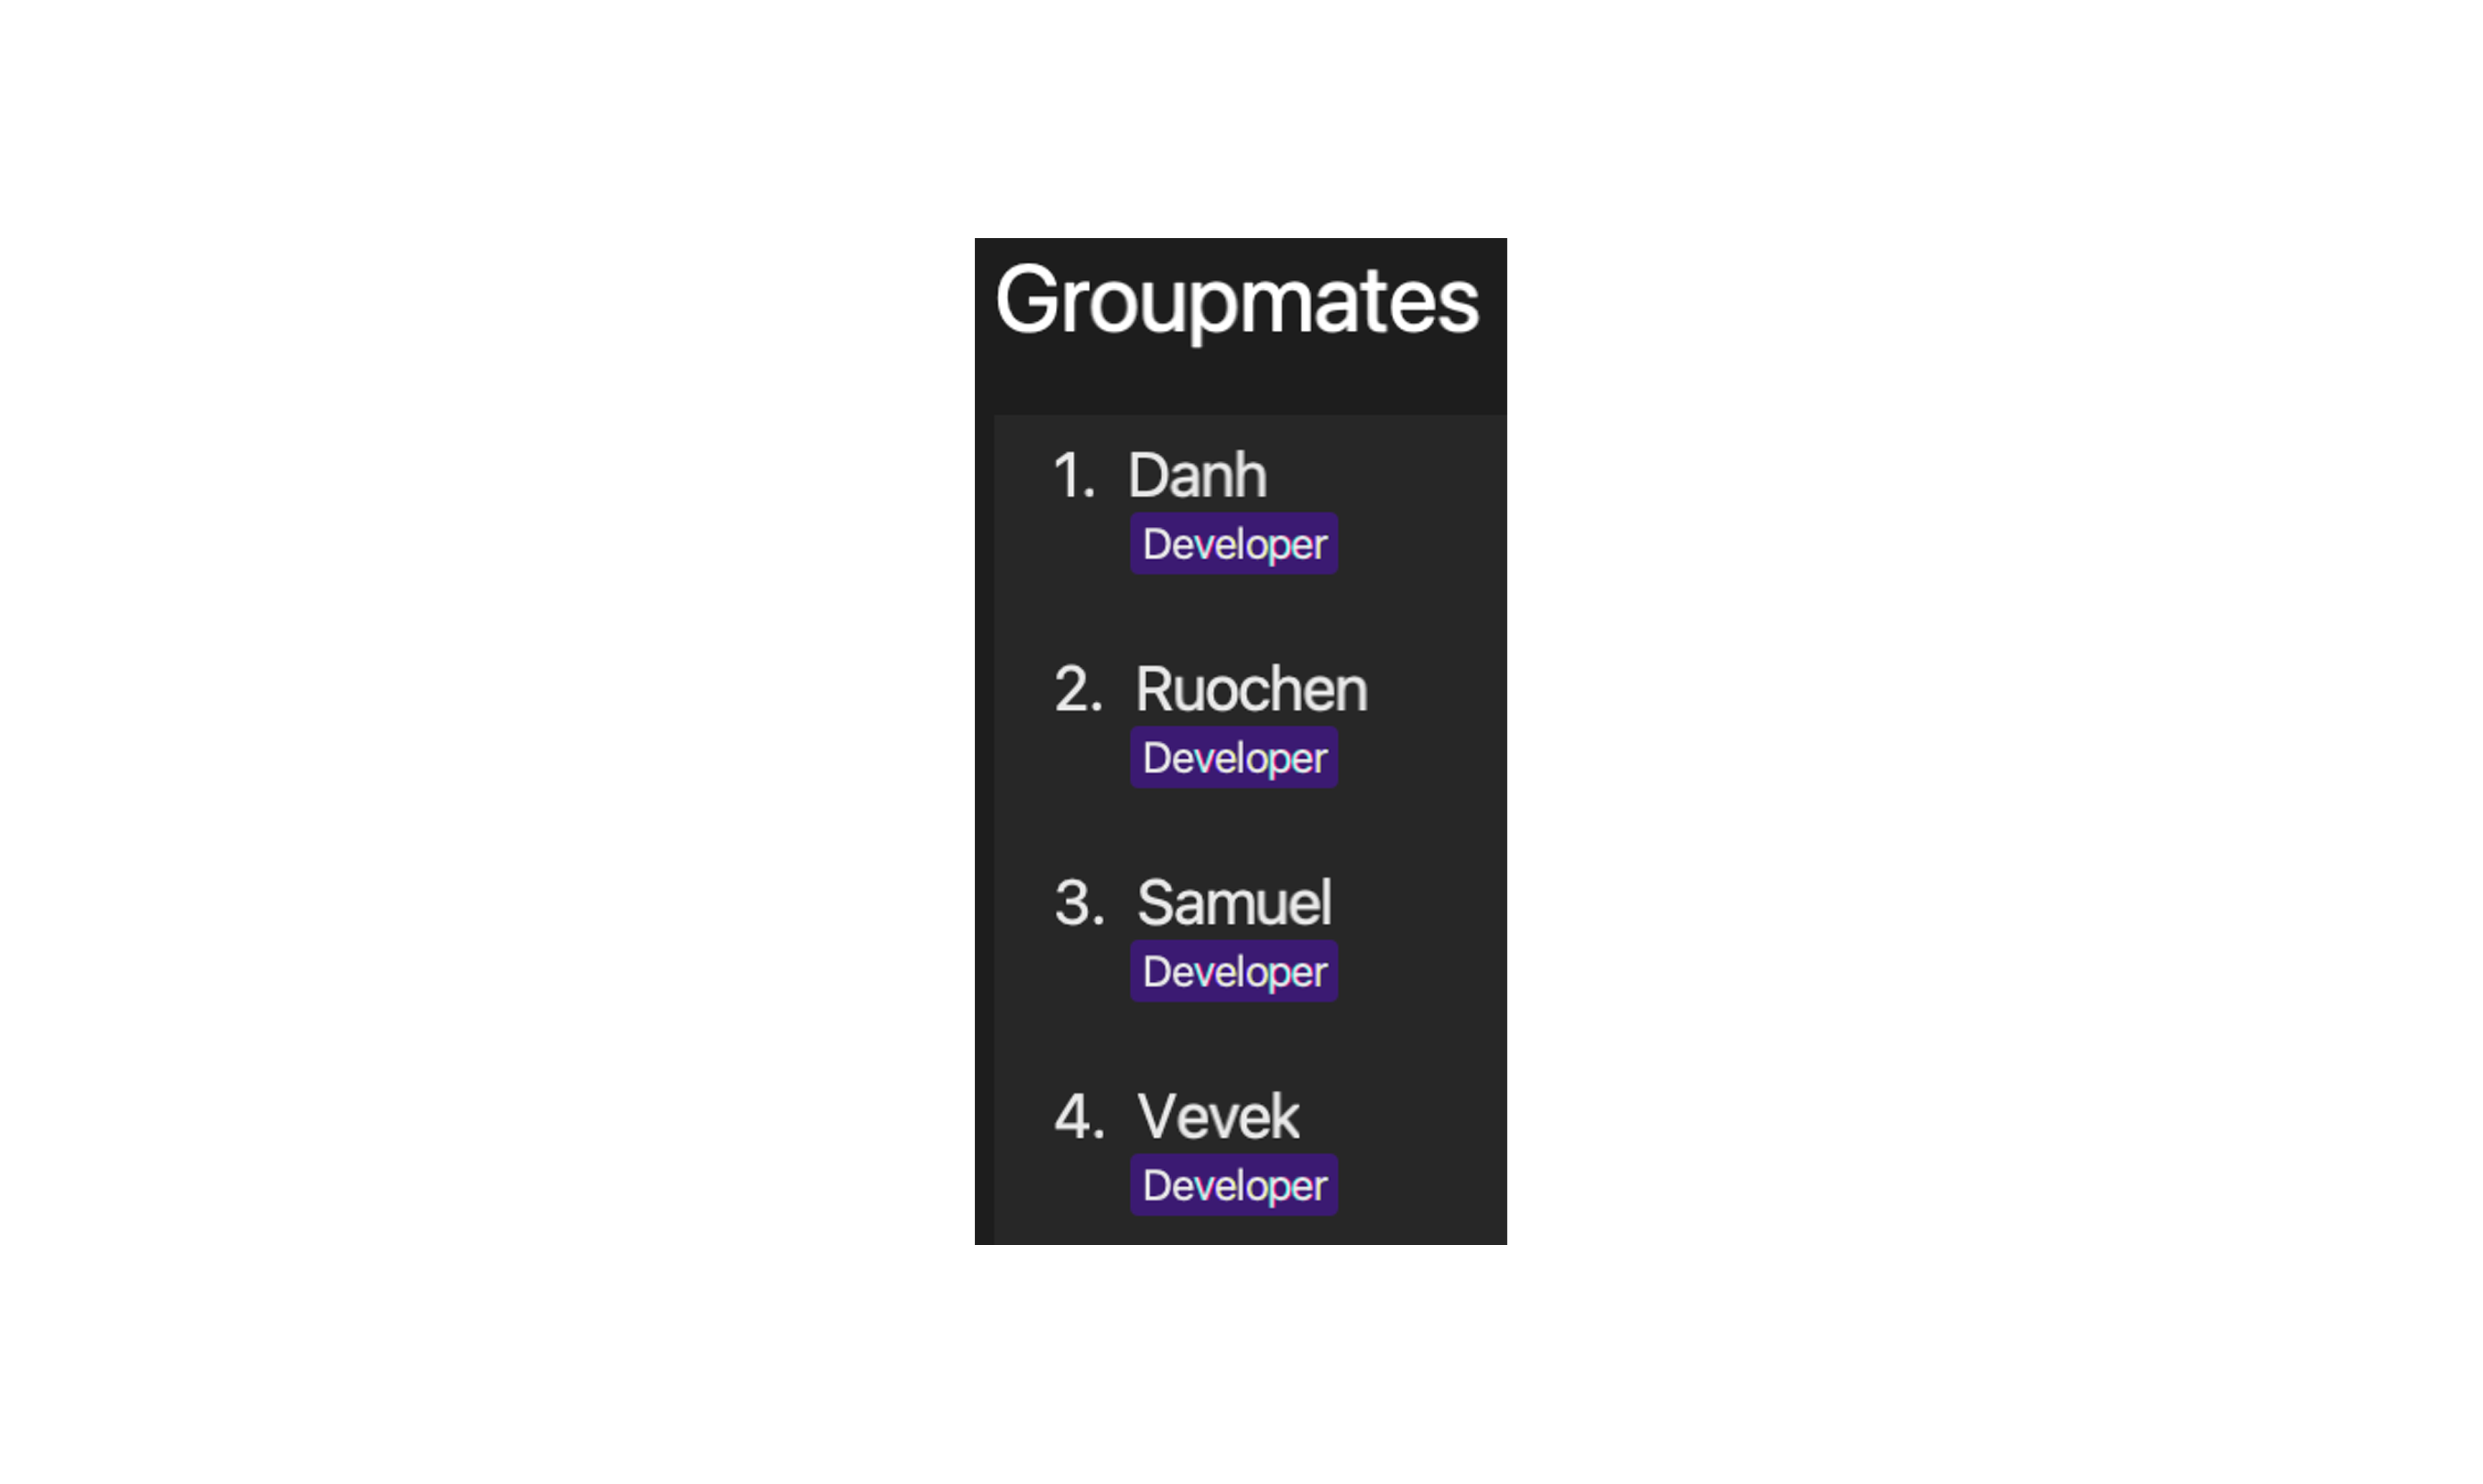
Groupmates contain a name and zero or more roles. The role serves to indicate their role in the project.
Groupmates are sorted alphabetically by name.
findC command to search for their name.
Adding a Groupmate to a Project: addG
Adds a groupmate to a project in CoLAB.
Format: addG PROJECT_INDEX n/NAME [r/ROLE]…
- Adds a groupmate with a
NAMEand zero or moreROLEs to the project at the specifiedPROJECT_INDEX.
Parameters:
-
PROJECT_INDEXThe index of the project. -
NAMEThe name of the groupmate. -
ROLEThe roles of the groupmate.
Examples:
-
addG 1 n/John Doeadds a groupmate with the nameJohn Doeto the first project. -
addG 2 n/Betsy Crowe r/developeradds a groupmate with the nameBetsy Croweand the roledeveloperto the second project.
Updating a Groupmate: updateG
Updates an existing groupmate of a project in CoLAB.
Format: updateG PROJECT_INDEX i/GROUPMATE_INDEX [n/NAME] [r/ROLE]…
- Updates a groupmate with a new
NAMEor zero or moreROLEs at the specifiedGROUPMATE_INDEXof the project at the specifiedPROJECT_INDEX. - Existing values will be updated to the input values.
![]() Info:
Info:
- At least one of the optional parameters must be provided.
- When updating roles, the existing roles of the groupmate will be removed i.e. adding of roles is not cumulative.
- You can remove all the roles of the groupmate by giving only one
r/without specifying any roles after it.
Parameters:
-
PROJECT_INDEXThe index of the project. -
GROUPMATE_INDEXThe index of the groupmate. -
NAMEThe updated name of the groupmate. -
ROLEThe updated roles of the groupmate.
Examples:
-
updateG 1 i/1 n/Leslie KnopeUpdates the name of the first groupmate of the first project with the new nameLeslie Knope. -
updateG 2 i/2 n/Betsy Crower r/Updates the name of the second groupmate of the second project with the new nameBetsy Crowerand clears all existing roles. -
updateG 2 i/3 n/Betsy Crower r/group-leader r/testerUpdates the name of the third groupmate of the first project to the new nameBetsy Crowerand changes her roles togroup-leaderandtester.
Deleting a Groupmate From a Project: deleteG
Deletes a groupmate from a project in CoLAB.
Format: deleteG PROJECT_INDEX i/GROUPMATE_INDEX
- Deletes the groupmate at the specified
GROUPMATE_INDEXfrom the project at the specifiedPROJECT_INDEX.
Parameters:
-
PROJECT_INDEXThe index of the project. -
GROUPMATE_INDEXThe index of the groupmate.
Example:
-
deleteG 1 i/1deletes the first groupmate of the first project.
4.2 Contacts
Contacts are used in CoLAB to store contact information about a person, to help you keep track of people you contact frequently.
Each contact contains a name, phone_number, email, address and zero or more tags.
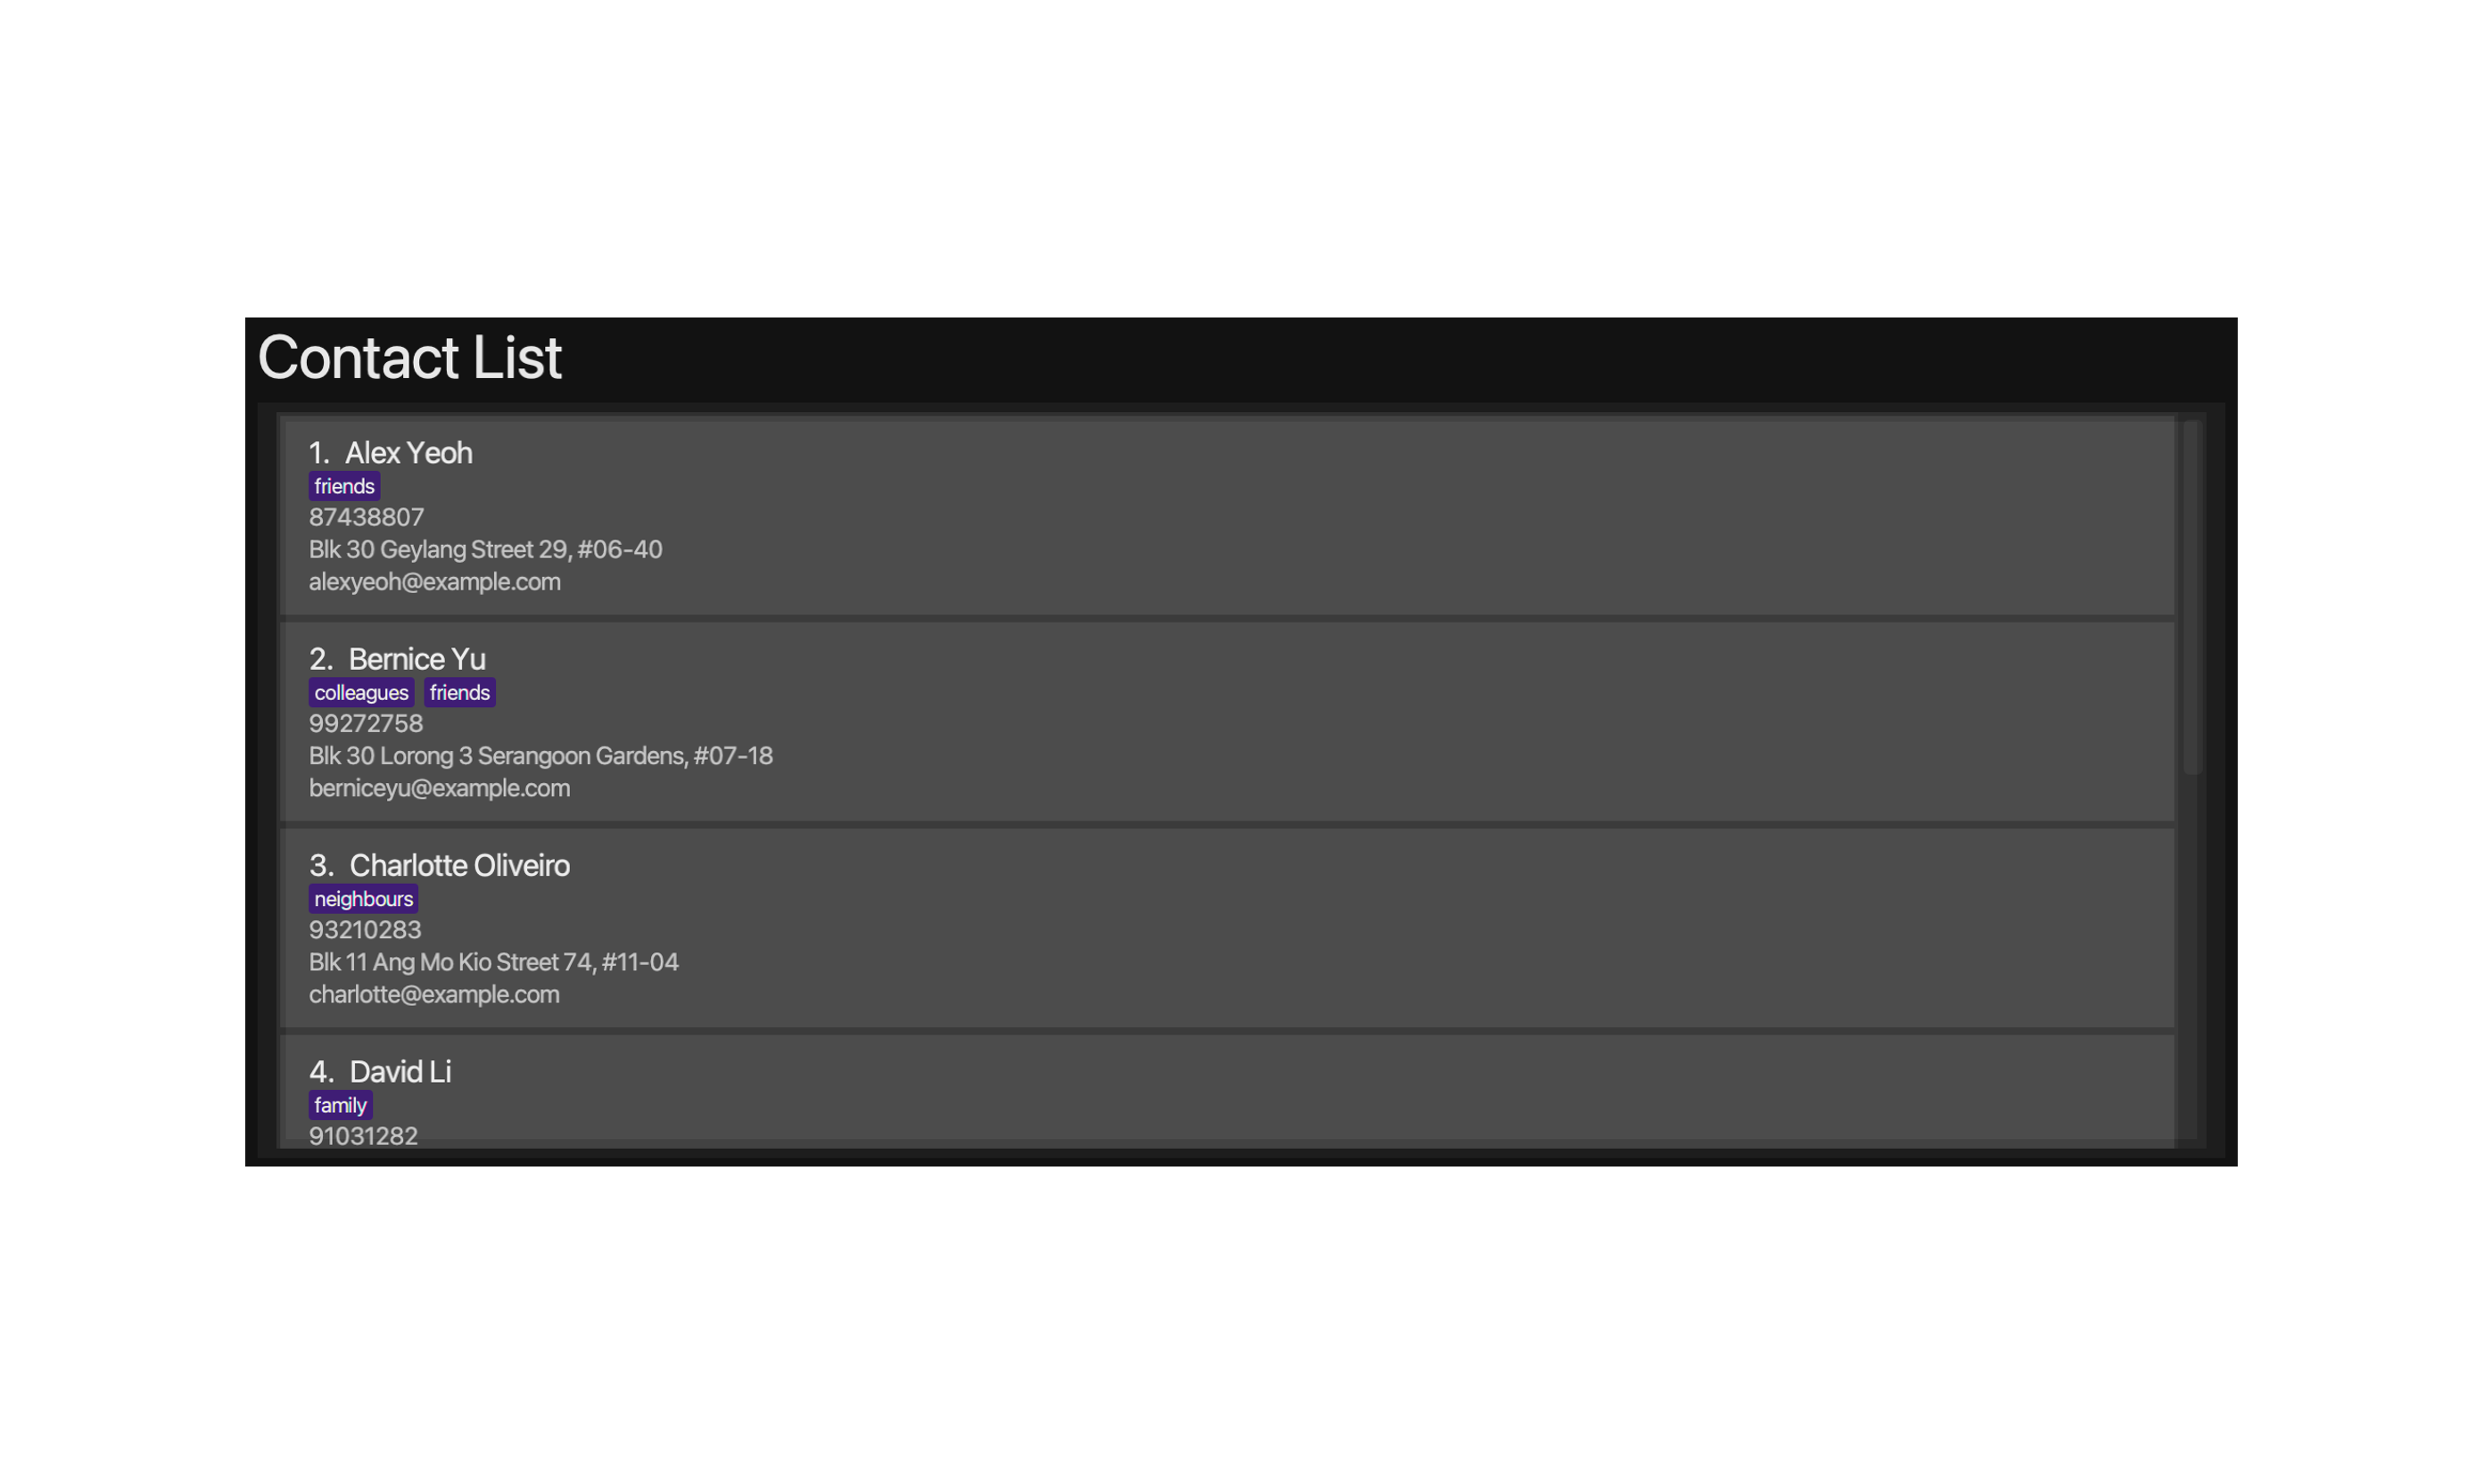
Viewing All Contacts: contacts
Displays a panel with a list of all contacts in CoLAB.
Format: contacts
Adding a Contact: addC
Adds a contact to CoLAB.
Format: addC n/NAME p/PHONE_NUMBER e/EMAIL a/ADDRESS [t/TAG]…
- Adds a contact with the a
NAME,PHONE_NUMBER,EMAIL,ADDRESSand zero or moreTAGs to CoLAB.
Parameters:
-
NAMEThe name of a contact. -
PHONE_NUMBERThe phone number of a contact. -
EMAILThe email of a contact. -
ADDRESSThe address of a contact. -
TAGThe tag associated with a contact.
-. For example, if you do not have the address of a contact, you can enter the parameter as a/-.
Example:
-
addC n/John Doe p/98765432 e/johnd@example.com a/John street, block 123, #01-01adds a contact with the nameJohn Doe, phone number98765432, emailjohnd@example.comand addressJohn street, block 123, #01-01.
Updating a Contact: updateC
Updates an existing contact in CoLAB.
Format: updateC CONTACT_INDEX [n/NAME] [p/PHONE_NUMBER] [e/EMAIL] [a/ADDRESS] [t/TAG]…
- Updates the contact at the specified
CONTACT_INDEXwith a newNAME,PHONE_NUMBER,EMAIL,ADDRESSor zero or moreTAGs. - Existing values will be updated to the input values.
![]() Info:
Info:
- At least one of the optional parameters must be provided.
- When updating tags, the existing tags of the contact will be removed i.e. adding of tags is not cumulative.
- You can remove all the contact’s tags by giving only one
t/without specifying any tags after it.
Parameters:
-
NAMEThe updated name of the contact. -
PHONE_NUMBERThe updated phone number of the contact. -
EMAILThe updated email of the contact. -
ADDRESSThe updated address of the contact. -
TAGThe updated tag of the contact.
Examples:
-
updateC 1 p/91234567 e/johndoe@example.comupdates the first contact with a new phone number91234567and emailjohndoe@example.com. -
updateC 2 n/Betsy Crower t/updates the second contact with a new nameBetsy Crowerand clears all existing tags.
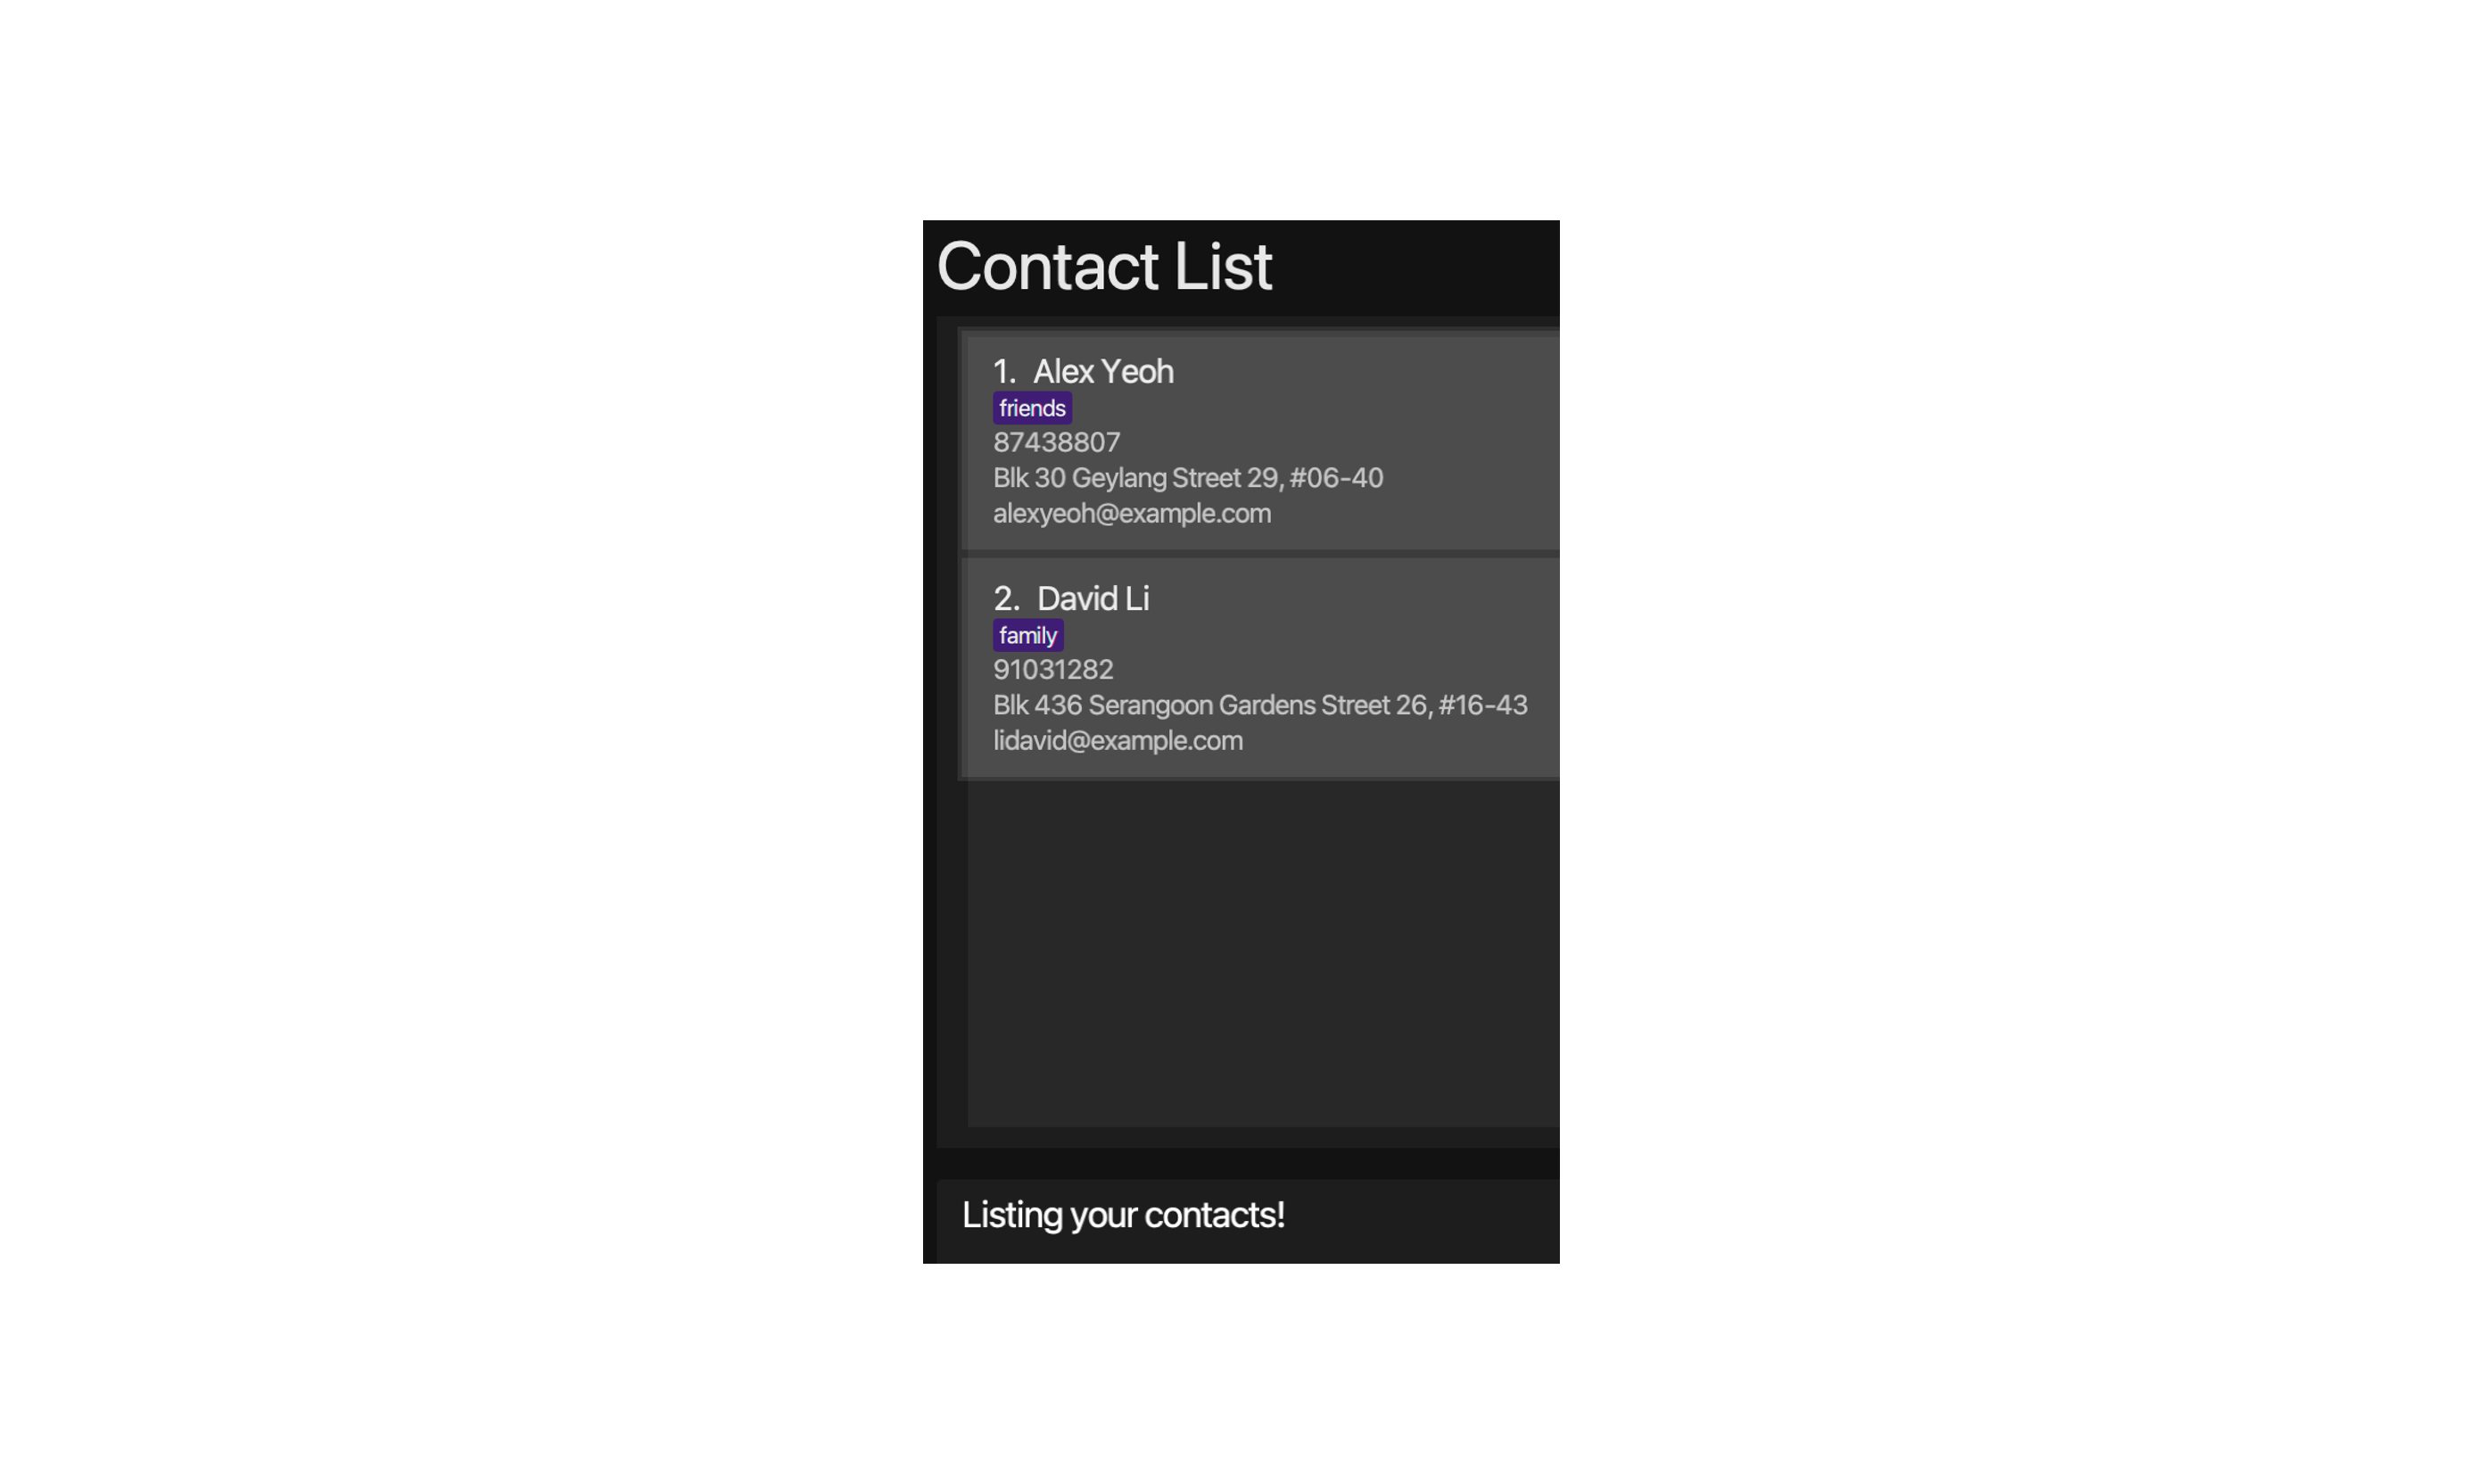
Locating Contacts by Name: findC
Find contacts whose names contain any of the given keywords.
Format: findC KEYWORD [KEYWORD]…
- Finds and displays contacts whose name contains any of the
KEYWORDs. - At least one keyword must be present.
![]() Info:
Info:
- The search is case-insensitive. e.g.
hanswill matchHans - The order of the keywords does not matter. e.g.
Hans Bowill matchBo Hans - Only the contact name is searched.
- Only full words will be matched e.g.
Hanwill not matchHans - Contacts matching at least one keyword will be returned (i.e.
ORsearch). e.g.Hans Bowill returnHans Gruber,Bo Yang
findC command is executed, only the relevant contacts will be shown. To view all contacts again, simply enter the contacts command or click on the contacts button in the side panel.
Parameter:
-
KEYWORDThe keyword used to search for contacts.
Example:
-
findC alex daviddisplays a list containingAlex YeohandDavid Li
Deleting a Contact: deleteC
Deletes a contact from CoLAB.
Format: deleteC CONTACT_INDEX
- Deletes the contact at the specified
CONTACT_INDEX.
Parameter:
-
CONTACT_INDEXThe index of the contact.
Examples:
-
deleteC 2deletes the second contact in CoLAB. -
findC Betsyfollowed bydeleteC 1deletes the first contact in the results list of thefindCcommand.
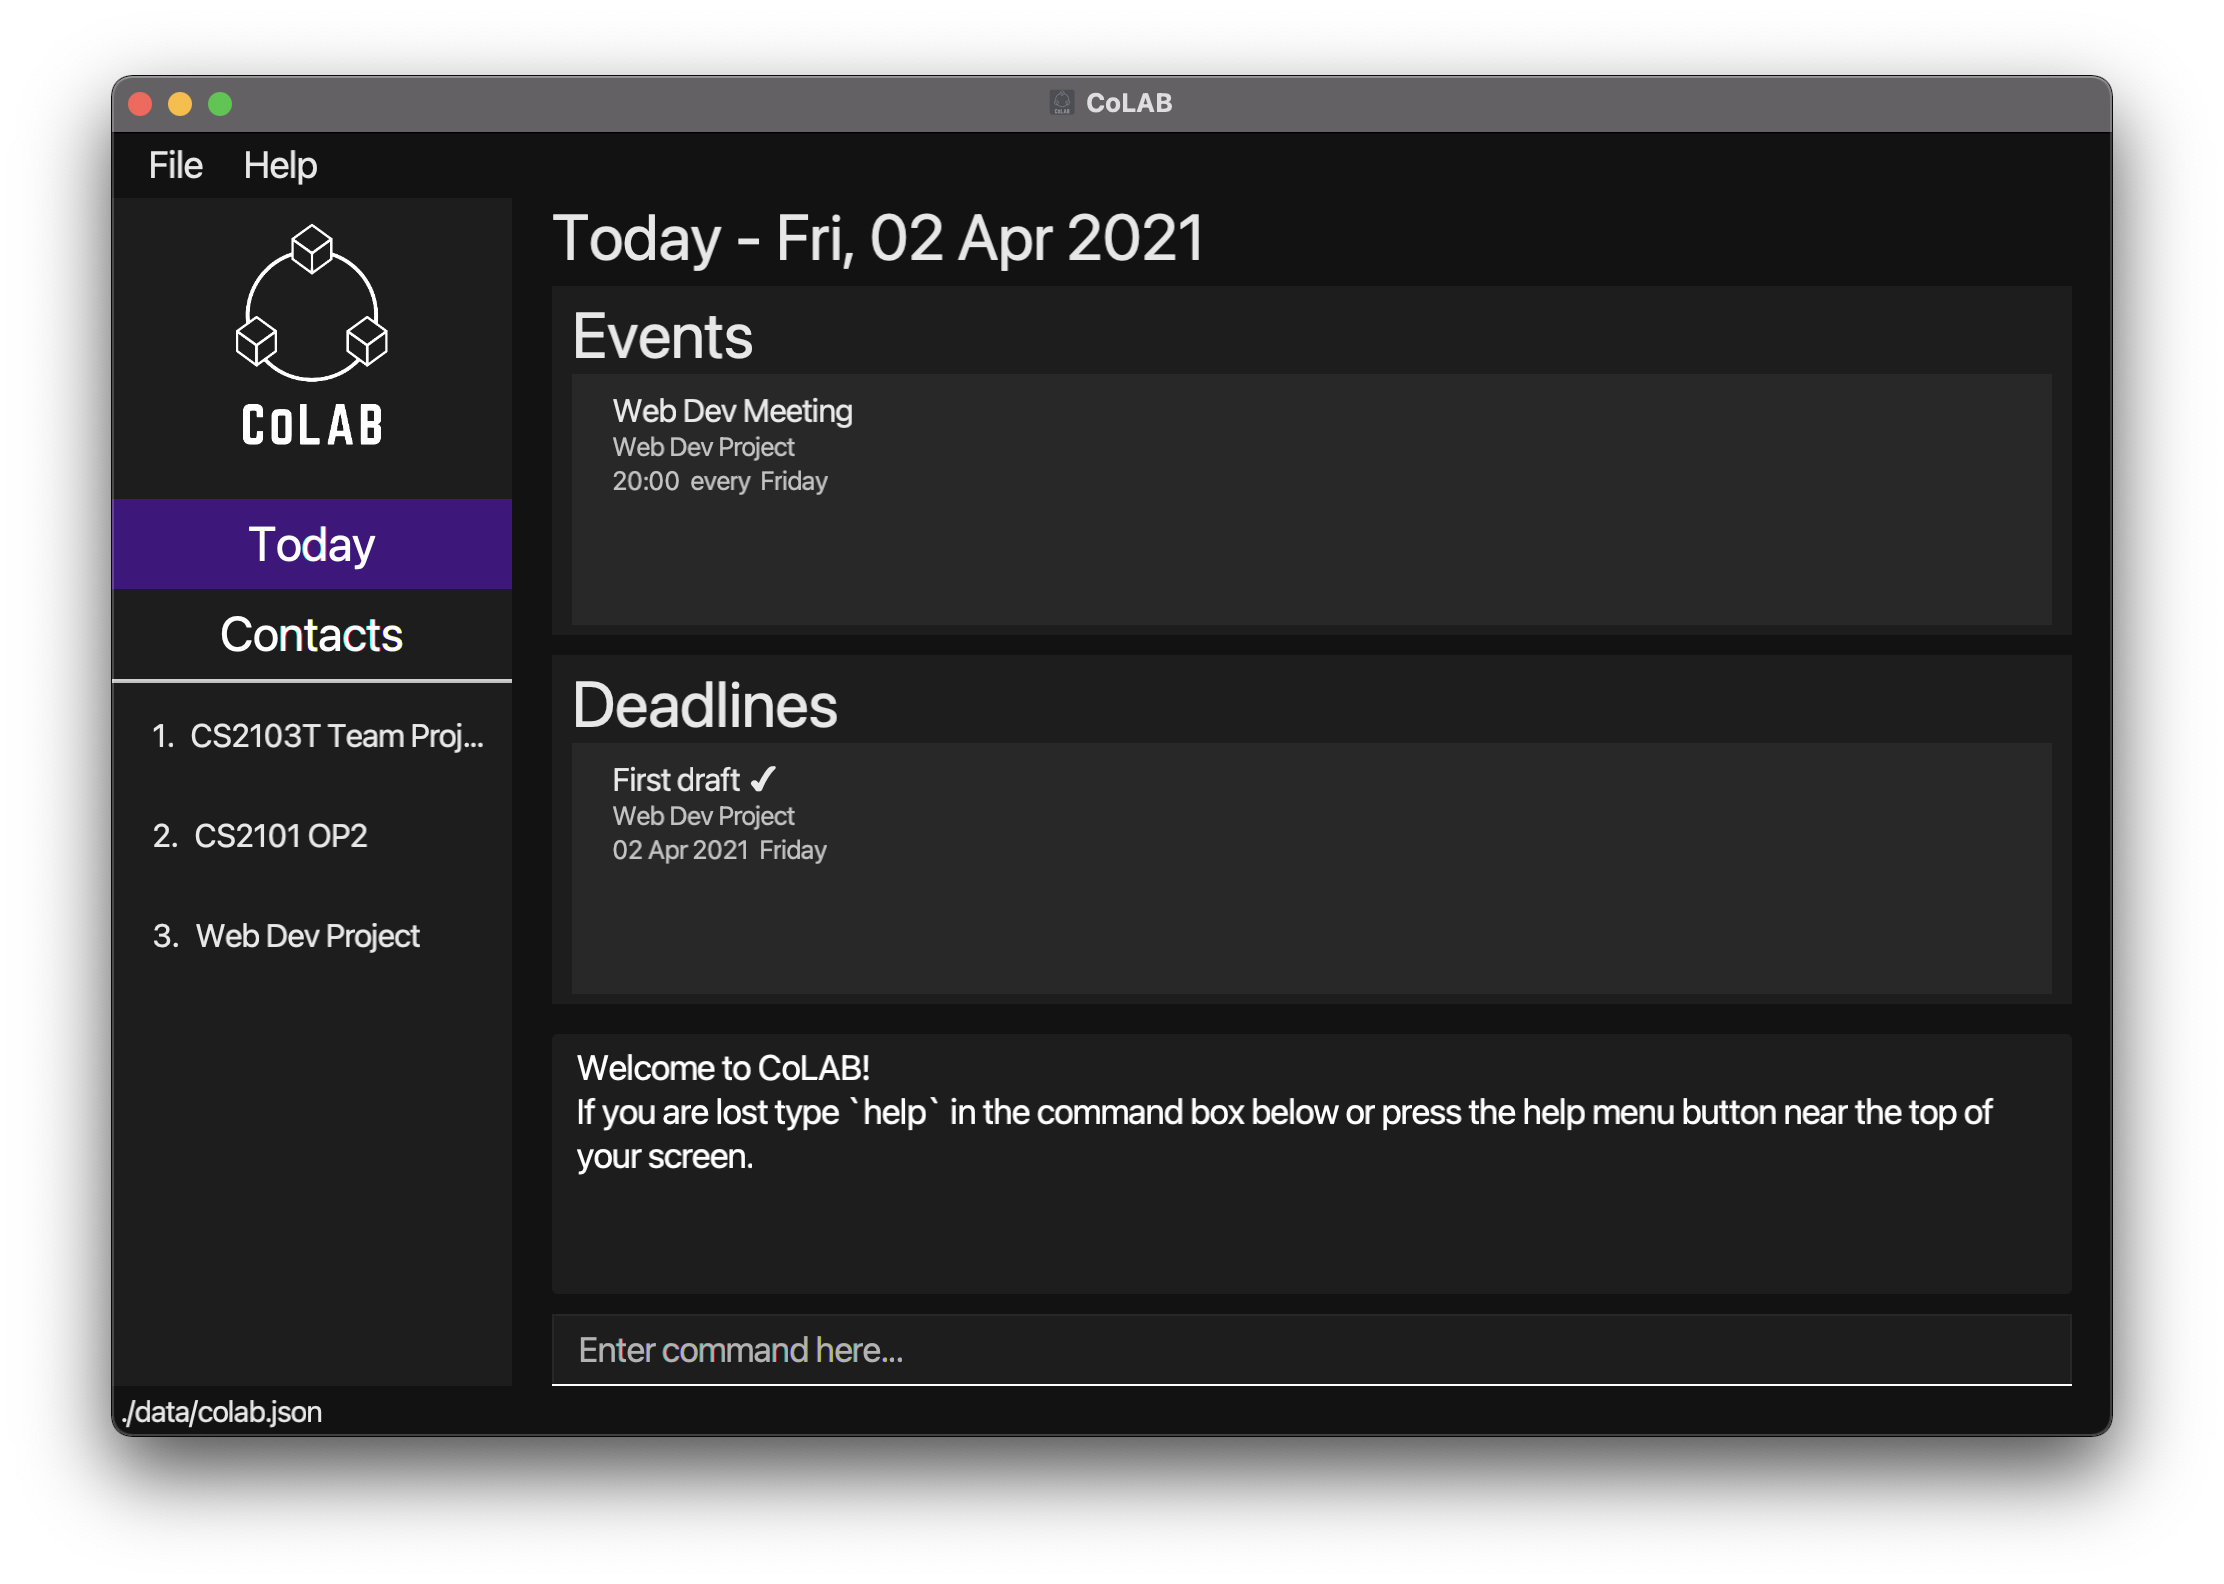
4.3 Today View
The today view contains a summary of the events and deadlines due today.

Viewing Today Panel: today
Displays a panel containing information on Events & Deadlines that are relevant today.
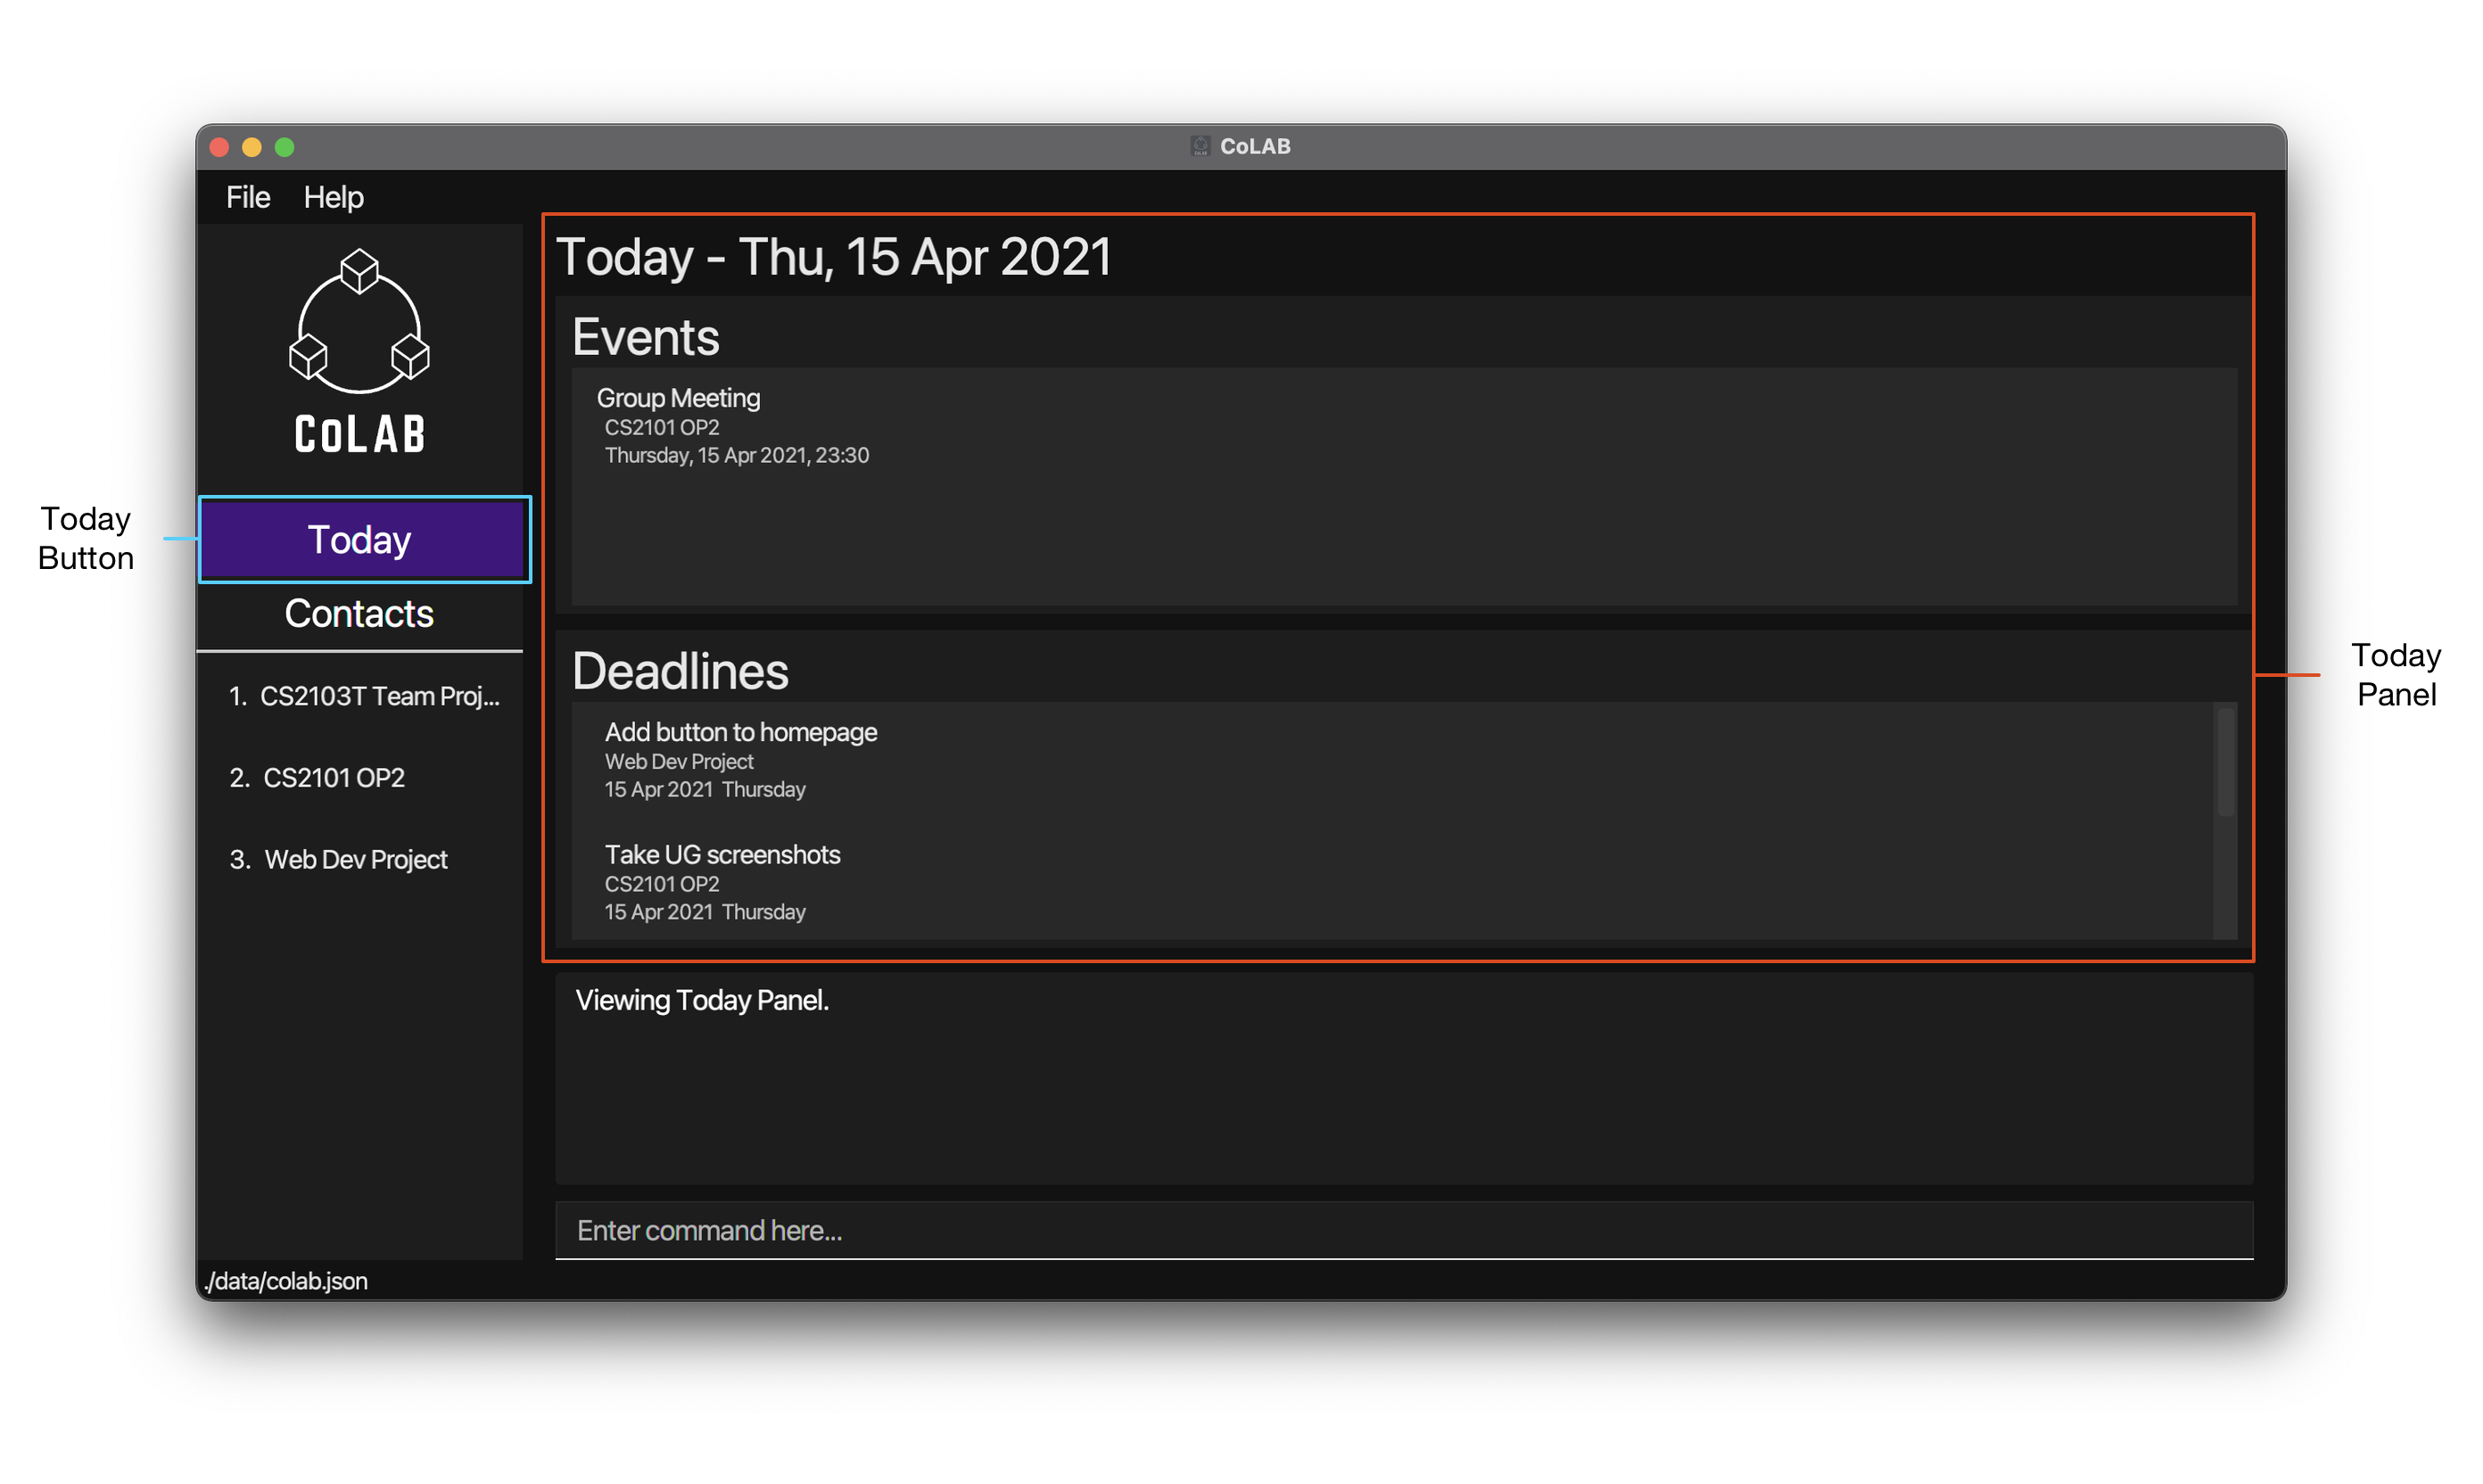
Format: today
4.4 Others
Viewing Help: help
Displays a panel containing a summary of commands as well as a link to this user guide. The link can be copied to the system clipboard by clicking on the Copy button.
Format: help
Undoing Previous Command: undo
Restores CoLAB to the state before the previous undoable command was executed.
Format: undo
![]() Info:
Info:
- Only commands that modify data are undoable. These commands include all commands that start with
add,update,deleteormarkas well as theclearcommand. - All other commands are not undoable.
Example:
-
deleteP 1Deletes the first project in the list. -
undoReverses thedeleteP 1command.
Redoing Previous Command: redo
Reverses the most recent undo command.
Format: redo
- Requires an undo command to have been performed before a redo command.
Exiting the Program: exit
Exits the program.
Format: exit
Clearing All Entries: clear
Clears all entries from CoLAB. Both contacts and projects will be cleared.
Format: clear
5. FAQ
Q: How do I transfer my data to another Computer?
A: Install the app in the other computer and overwrite the empty data file it creates with the file that contains the data of your previous CoLAB home folder.
Q: How do I save my data?
A: CoLAB’s data is saved in the hard disk automatically after any command that changes the data. There is no need to save manually.
Q: Are my contacts and project groupmates linked?
A: No, currently there is no link between contacts and groupmates. This is a feature that we plan to add in future versions of CoLAB. However, you may still add a contact with the contact details of the groupmate. Once the contact has been added, you can then easily find the contact by using the findC command to search for their name.
Q: Can I edit the data files directly?
A: CoLAB’s data is saved as a JSON file [JAR file location]/data/colab.json. Advanced users are welcome to update data directly by editing that data file.
6. Command summary
Projects
| Action | Format, Examples |
|---|---|
| View Project | project PROJECT_INDEX |
| View Overview | overview |
| View Todos | todos |
| Add Project | addP n/NAME |
| Update Project | updateP PROJECT_INDEX n/NAME |
| Delete Project | deleteP PROJECT_INDEX |
Todos
| Action | Format, Examples |
|---|---|
| Add Todo to Project | addT PROJECT_INDEX d/DESCRIPTION |
| Mark Todo as done | markT PROJECT_INDEX i/TODO_INDEX |
| Update Todo | updateT PROJECT_INDEX i/TODO_INDEX d/DESCRIPTION |
| Delete Todo from Project | deleteT PROJECT_INDEX i/TODO_INDEX |
Deadlines
| Action | Format, Examples |
|---|---|
| Add Deadline to Project | addD PROJECT_INDEX d/DESCRIPTION by/DATE |
| Mark Deadline as done | markD PROJECT_INDEX i/DEADLINE_INDEX |
| Update Deadline | updateD PROJECT_INDEX i/DEADLINE_INDEX [d/DESCRIPTION] [by/DATE] |
| Delete Deadline from Project | deleteD PROJECT_INDEX i/DEADLINE_INDEX |
Events
| Action | Format, Examples |
|---|---|
| Add Event to Project | addE PROJECT_INDEX d/DESCRIPTION on/DATE at/TIME w/REPEAT_WEEKLY |
| Update Event | updateE PROJECT_INDEX i/EVENT_INDEX [d/DESCRIPTION] [on/DATE] [at/TIME] [w/REPEAT_WEEKLY] |
| Delete Event from Project | deleteE PROJECT_INDEX i/EVENT_INDEX |
Groupmates
| Action | Format, Examples |
|---|---|
| Add Groupmate to Project | addG PROJECT_INDEX n/NAME [r/ROLE]… |
| Update Groupmate | updateG PROJECT_INDEX i/GROUPMATE_INDEX [n/NAME] [r/ROLE]… |
| Delete Groupmate from Project | deleteG PROJECT_INDEX i/GROUPMATE_INDEX |
Contacts
| Action | Format, Examples |
|---|---|
| View Contacts | contacts |
| Add Contact | addC n/NAME p/PHONE_NUMBER e/EMAIL a/ADDRESS [t/TAG]… |
| Delete Contact | deleteC CONTACT_INDEX |
| Update Contact | updateC CONTACT_INDEX [n/NAME] [p/PHONE_NUMBER] [e/EMAIL] [a/ADDRESS] [t/TAG]… |
| Find Contact | findC KEYWORD [KEYWORD]… |
Today View and Other Commands
| Action | Format, Examples |
|---|---|
| View Today Panel | today |
| Help | help |
| Undo previous command | undo |
| Redo previous command | redo |
| Exiting the Program | exit |
| Clear All Entries | clear |
7. Glossary
This section serves to provide a summary of descriptions and definitions of terms used throughout this User Guide. Familiarising yourself with this section will make the User Guide easier to read.
| Term | Meaning |
|---|---|
| Graphical User Interface (GUI) | A GUI allows users to use graphics to interact with a device. |
| Command Line Interface (GUI) | A CLI allows users to use commands in the form of text as input to a device. |
| Java | Java is a runtime environment that allows applications such as CoLAB to be run on your computer. |
| Command | An instruction typed by a user, to be executed by CoLAB. |
| Parameter | A section of a command that requires information to be entered into. |
| Prefix | An abbreviation for the name of a parameter that is to be entered right before the actual parameter of a command. Prefix’s end with a slash (/). |
| Panel | A page or section that contains information in the GUI. |
| Project | A project in CoLAB contains information about todos, deadlines, events and groupmates to help you keep track of everything you need to effectively manage a project. |
| Todo | A todo in CoLAB represents a task that has to be done. These are usually short-term tasks that have to be done in a short timeframe or have no due date. |
| Deadline | A deadline in CoLAB represents a project deadline that has to be completed before a due date. |
| Event | An event in CoLAB represents a project-specific event that occurs on a particular day and time. |
| Groupmate | A groupmate in CoLAB represents the people you work with for a particular project. |
| Role | A role associated with a groupmate in a project. An example role may be ‘leader’. |
| Contact | A contact in CoLAB represents contact information about a person. |
| Tag | A tag associated with a contact. An example role may be ‘classmate’. |